Hauptseite/en: Unterschied zwischen den Versionen
Weitere Optionen
Isan (Diskussion | Beiträge) Keine Bearbeitungszusammenfassung |
Übernehme Bearbeitung einer neuen Version der Quellseite |
||
| (13 dazwischenliegende Versionen von 2 Benutzern werden nicht angezeigt) | |||
| Zeile 8: | Zeile 8: | ||
We hope that this user guide will help you to get the most out of HITGuard. Thank you for choosing our solution! | We hope that this user guide will help you to get the most out of HITGuard. Thank you for choosing our solution! | ||
===<span id="modules"></span> The HITGuard menu === | ===<span id="modules"></span> The HITGuard menu === | ||
| Zeile 148: | Zeile 106: | ||
*[[Special:MyLanguage/Jobs|Jobs]] | *[[Special:MyLanguage/Jobs|Jobs]] | ||
}} | }} | ||
====HITGuard basic modules==== | |||
The Risk management, Measures, and Controls, as well as Administration are always available in HITGuard and form the basis of the tool: | |||
{| class="wikitable" | |||
!Risk management | |||
|The ''Risk management'' module helps you identify and assess risks and opportunities, and provides you with a central platform to manage your risk assessments. You can freely configure your risk policy and use different workflows that support you in your risk management.<br><br>Find a rough overview of the risk and opportunity workflow [[Special:MyLanguage/Workflow_Risiko Chance|here]].<br>Find information on risks and opportunities for Practitioners [[Special:MyLanguage/Meine_Aufgaben_Gefährdungslagen|here]]. | |||
|- | |||
!Measures | |||
|The ''Measures'' module helps you implement measures to eliminate or reduce risks and security gaps. You can monitor the implementation of your measures with progress reports and test their effectiveness.<br><br>Find a rough overview of the measure workflow [[Special:MyLanguage/Workflow_Maßnahme|here]].<br>Find information on measures for Practitioners [[Special:MyLanguage/Maßnahmenstatus|here]]. | |||
|- | |||
!Controls | |||
|The ''Controls'' module allows you to manage and evaluate your controls and their effectiveness. You can create control definitions and track the execution of the corresponding controls.<br><br>Find a rough overview of the control workflow [[Special:MyLanguage/Workflow_Kontrolle|here]].<br>Find information on controls for Practitioners [[Special:MyLanguage/Kontrollen|hier]]. | |||
|- | |||
!Administration | |||
|In the ''Administration'' module, you can configure HITGuard and adapt it to your specific requirements. Here you will also find functions for managing user accounts, roles and teams as well as for integrating HITGuard into existing systems and processes. | |||
|- | |||
|} | |||
====HITGuard Add-ons==== | |||
There are various extensions for HITGuard in order to cover further use cases. | |||
{| class="wikitable" | |||
!Data protection | |||
|The ''Data Protection'' module helps you comply with data protection regulations and policies.<br><br>With an activated data protection add-on you receive the menu item "Data protection", the contents of which you can find below. Data protection is licensed separately and can be activated under Administration > Management systems for one management system.<br><br>Find a rough overview of the PA workflow [[Special:MyLanguage/Workflow_VT|here]].<br>Find more on working with PAs for Practitioners [[Special:MyLanguage/Meine_Verarbeitungstätigkeiten#Verarbeitungstätigkeit_bearbeiten/erstellen/updaten|here]]. | |||
|- | |||
!Audit management | |||
|The ''Audit management'' module allows you to conduct internal and external audits, track the results and generate reports.<br><br>With an activated audit management add-on you receive the menu item "Audit management", the contents of which you can find below. Audit management is licensed separately and can be activated under Administration > Management systems for one or more management systems. | |||
|- | |||
!Case management | |||
|The ''Case management'' module supports you in handling security incidents and breaches of policies and regulations.<br><br>With an activated case management add-on you receive the menu item "Case management", the contents of which you can find below. Case management is licensed separately and can be activated under Administration > Management systems for one or more management systems. | |||
|- | |||
!Doc management | |||
|The module ''Doc management'' encapsulates document control, uploaded attachments, and the report archive.<br><br>With an activated doc management add-on you receive the menu item "Doc management", the contents of which you can find below. Doc management is licensed separately and can be activated for you by your contact person at TogetherSecure.<br><br>Find a rough overview of the doc management workflow [[Special:MyLanguage/Workflow_Doku-Management|here]].<br>Find information on the review and approval workflow [[Special:MyLanguage/Freigabeworkflow|here]]. | |||
|- | |||
!ESG management | |||
|The ''ESG'' module supports you in the execution of the double materiality analysis.<br><br>With an activated ESG management add-on your risk management is extended by a few menu items. ESG management is licensed separately and can be activated for you by your contact person at TogetherSecure.<br><br>Find more on ESG management [[Special:MyLanguage/ESG Management|here]]. | |||
|- | |||
!Supplier risk management | |||
|The ''Supplier Risk Management'' module allows you to send reviews to suppliers and thus include them in your audit processes.<br><br>With an activated supplier risk management add-on your administration and reviews are extended by a few menu items and options. Supplier risk management is licensed separately and can be activated for you by your contact person at TogetherSecure.<br><br>Find more on supplier risk management [[Special:MyLanguage/Supplier Risk Management|here]]. | |||
|- | |||
|} | |||
Under [[Special:MyLanguage/Hauptseite#How_To_Start|How To Start]] you find the first steps for implementing a management system and for all the add-ons. | |||
<span id="Die_HITGuard_Oberfläche"></span> | <span id="Die_HITGuard_Oberfläche"></span> | ||
| Zeile 158: | Zeile 158: | ||
The marked areas in the image show: | The marked areas in the image show: | ||
# Intro for the current page: If the current page has an interactive introduction, it can be started via this icon. | # Intro for the current page: If the current page has an interactive introduction, it can be started via this icon. | ||
# Collapse/expand menu: With this button, the navigation menu can be collapsed, or expanded again. | # Collapse/expand menu: With this button, the navigation menu can be collapsed, or expanded again. | ||
| Zeile 164: | Zeile 163: | ||
# Current management tasks, logout, and change language: | # Current management tasks, logout, and change language: | ||
#* You receive information about your [[#cur_man_act|current management tasks]] via the envelope. | #* You receive information about your [[#cur_man_act|current management tasks]] via the envelope. | ||
#* You can configure a page's accessibility with the person-symbol. | |||
#* The flag can be used to switch between English and German. | |||
#* The logout button logs you out. | #* The logout button logs you out. | ||
<span id="Hauptmenü"></span> | <span id="Hauptmenü"></span> | ||
| Zeile 232: | Zeile 231: | ||
====Module-specific menu items==== | ====Module-specific menu items==== | ||
Right after the dashboard menu items, you find the [[#modules|module-specific menu items]]. Which modules are shown here depends on the user's authorizations as well as on the features activated for the management system. | Right after the dashboard menu items, you find the [[#modules|module-specific menu items]]. Which modules are shown here depends on the user's authorizations as well as on the features activated for the management system. | ||
====AI features==== | |||
[[Datei:SternchenbuttonKI.png|thumb|right|60px]] HITGuard offers a multitude of possibilities of AI support across the application. In html-editable fields, meaning fields in which you can format the text, you find a "starlet" button with which you can call up AI functions. With the help of AI you can | |||
*summarize, | |||
*proofread, | |||
*extend, | |||
*shorten, | |||
*change the style of, | |||
*change the tone of, | |||
*and translate texts between English and German.<br> | |||
Furthermore, you can ask AI questions using your own prompts and thus generate your own texts.<p>A special function is available in gap analyses, where the AI functions can be used in the non-html-editable field of the justification. | |||
<span id="Hilfe"></span> | <span id="Hilfe"></span> | ||
| Zeile 318: | Zeile 328: | ||
=== Administrators === | === Administrators === | ||
:*[[Special:MyLanguage/REST API| | :*[[Special:MyLanguage/REST API| REST API: Data import/export interface]] | ||
===External users=== | ===External users=== | ||
| Zeile 346: | Zeile 356: | ||
== Release Notes == | == Release Notes == | ||
<div class="mw-translate-fuzzy"> | |||
{| class="wikitable" | {| class="wikitable" | ||
!Year | !Year | ||
| Zeile 351: | Zeile 362: | ||
|- | |- | ||
!2025 | !2025 | ||
| | |[[Special:MyLanguage/HITGuard Release April 2025 |April]] | ||
| | |[[Special:MyLanguage/HITGuard Release August 2025 |August]] | ||
| | | | ||
|- | |- | ||
| Zeile 385: | Zeile 396: | ||
|[[Special:MyLanguage/HITGuard Release Dezember 2019|December]] | |[[Special:MyLanguage/HITGuard Release Dezember 2019|December]] | ||
|} | |} | ||
</div> | |||
Release Notes from the years 2017 and 2018 were directly integrated into the help. | Release Notes from the years 2017 and 2018 were directly integrated into the help. | ||
| Zeile 392: | Zeile 404: | ||
* [[Special:MyLanguage/Passkeys|Passkeys]] | * [[Special:MyLanguage/Passkeys|Passkeys]] | ||
* [[Special:MyLanguage/2FA|2-factor-authentication]] | * [[Special:MyLanguage/2FA|2-factor-authentication]] | ||
== Installation assistance == | |||
*[[Special:MyLanguage/Installationshilfe |Installation assistance]] | |||
Aktuelle Version vom 27. November 2025, 08:27 Uhr
Welcome to HITGuard Help!
HITGuard offers you comprehensive support in managing and monitoring your risks and compliance requirements. In the menu navigation of HITGuard you will find various modules that support you in meeting your IT governance, risk management and compliance requirements.
This user help provides you with detailed information on how to use each of the HITGuard modules and describes the contents of the entire available menu.
We have designed this user help to be useful for beginners and experienced users alike. If you have any questions or need help, our support team will be happy to assist you if you contact us under support@hitguard.at.
We hope that this user guide will help you to get the most out of HITGuard. Thank you for choosing our solution!
The HITGuard menu
Find the help pages for all possible menu items of the individual modules here:
HITGuard basic modules
The Risk management, Measures, and Controls, as well as Administration are always available in HITGuard and form the basis of the tool:
| Risk management | The Risk management module helps you identify and assess risks and opportunities, and provides you with a central platform to manage your risk assessments. You can freely configure your risk policy and use different workflows that support you in your risk management. Find a rough overview of the risk and opportunity workflow here. Find information on risks and opportunities for Practitioners here. |
|---|---|
| Measures | The Measures module helps you implement measures to eliminate or reduce risks and security gaps. You can monitor the implementation of your measures with progress reports and test their effectiveness. Find a rough overview of the measure workflow here. Find information on measures for Practitioners here. |
| Controls | The Controls module allows you to manage and evaluate your controls and their effectiveness. You can create control definitions and track the execution of the corresponding controls. Find a rough overview of the control workflow here. Find information on controls for Practitioners hier. |
| Administration | In the Administration module, you can configure HITGuard and adapt it to your specific requirements. Here you will also find functions for managing user accounts, roles and teams as well as for integrating HITGuard into existing systems and processes. |
HITGuard Add-ons
There are various extensions for HITGuard in order to cover further use cases.
| Data protection | The Data Protection module helps you comply with data protection regulations and policies. With an activated data protection add-on you receive the menu item "Data protection", the contents of which you can find below. Data protection is licensed separately and can be activated under Administration > Management systems for one management system. Find a rough overview of the PA workflow here. Find more on working with PAs for Practitioners here. |
|---|---|
| Audit management | The Audit management module allows you to conduct internal and external audits, track the results and generate reports. With an activated audit management add-on you receive the menu item "Audit management", the contents of which you can find below. Audit management is licensed separately and can be activated under Administration > Management systems for one or more management systems. |
| Case management | The Case management module supports you in handling security incidents and breaches of policies and regulations. With an activated case management add-on you receive the menu item "Case management", the contents of which you can find below. Case management is licensed separately and can be activated under Administration > Management systems for one or more management systems. |
| Doc management | The module Doc management encapsulates document control, uploaded attachments, and the report archive. With an activated doc management add-on you receive the menu item "Doc management", the contents of which you can find below. Doc management is licensed separately and can be activated for you by your contact person at TogetherSecure. Find a rough overview of the doc management workflow here. Find information on the review and approval workflow here. |
| ESG management | The ESG module supports you in the execution of the double materiality analysis. With an activated ESG management add-on your risk management is extended by a few menu items. ESG management is licensed separately and can be activated for you by your contact person at TogetherSecure. Find more on ESG management here. |
| Supplier risk management | The Supplier Risk Management module allows you to send reviews to suppliers and thus include them in your audit processes. With an activated supplier risk management add-on your administration and reviews are extended by a few menu items and options. Supplier risk management is licensed separately and can be activated for you by your contact person at TogetherSecure. Find more on supplier risk management here. |
Under How To Start you find the first steps for implementing a management system and for all the add-ons.
The HITGuard interface
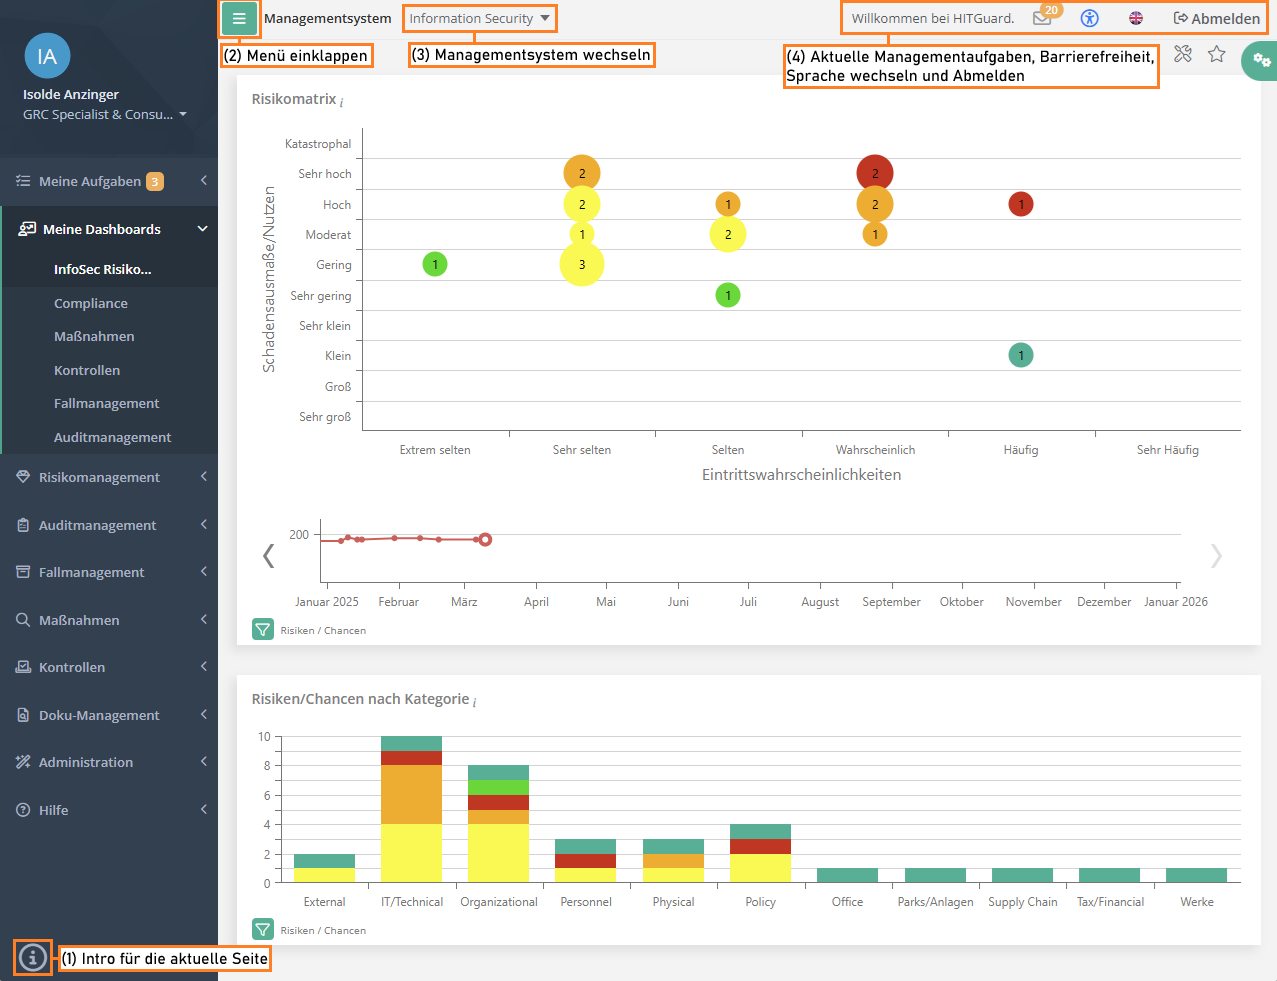
The screenshot gives information about the various areas of the HITGuard interface. In the top left corner you find the profile area of the logged-in user and below it the main menu. A click onto the profile picture takes you to the page Manage account. There, a user can modify their data, update their profile picture, or change the password.
The marked areas in the image show:
- Intro for the current page: If the current page has an interactive introduction, it can be started via this icon.
- Collapse/expand menu: With this button, the navigation menu can be collapsed, or expanded again.
- Switch management system: If the user is authorized for multiple management systems, they can switch between them here. This option is not shown for practitioners or users only authorized for a single management system.
- Current management tasks, logout, and change language:
- You receive information about your current management tasks via the envelope.
- You can configure a page's accessibility with the person-symbol.
- The flag can be used to switch between English and German.
- The logout button logs you out.
Main menu
The menu starts off with the "personal" menu items My tasks and My dashboards. These are follows by the menu items of the individual HITGuard modules. The user only sees those modules they are authorized for. Following the module menu items is the menu item Help.
My tasks
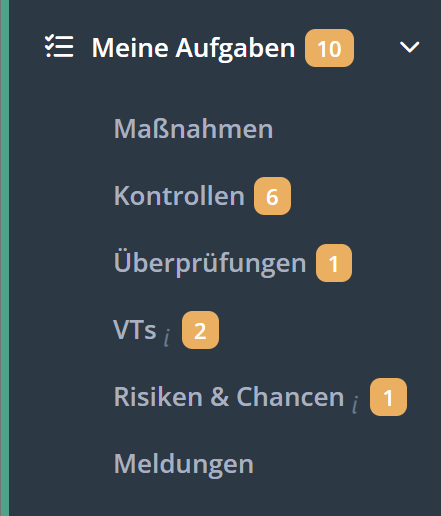
Under "My tasks" you will find the tasks you have to complete in your role as a practitioner. The menu on the left shows you at a glance if you have any pending tasks (orange number badge). This menu shows all items that are activated in at least one management system.
A click into the My tasks menu opens the Task dashboard. Here, you find a summary of all the tasks pending completion. In addition, clicking on My tasks opens a submenu that lets you view the tasks by type. There, you also find tasks you have already completed. Orange badges show how many taks you need to work on (e.g., requested progress reports or PAs to be reviewed). Blue badges show how many tasks, for which you are also responsible, somebody else needs to work on (e.g., reviews for which you are responsible but not an interview partner).
The states of the different elements are also explained here:
| Menu items: | Measures | Controls | Reviews | PAs | Risks & opportunities | Tickets |
|---|
My dashboards
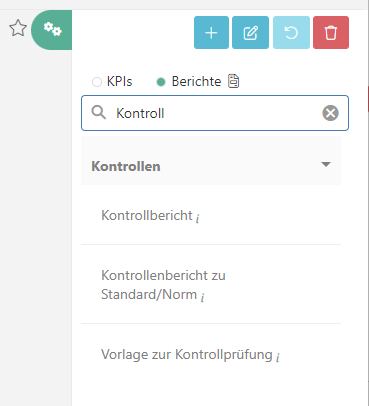
Dashboards are for getting an overview of the management systems by using key performance indicators (KPIs) and for preparing the reports that are needed regularly. By default, each management system has a dashboard for information related to risk management, to measures, and to controls. Data protection management systems also have a dedicated data protection dashboard, case management systems have a case management dashboard, and audit management systems have an audit management dashboard. However, only dashboards, KPIs, and reports for which the user is authorized are displayed.
In order for a user to access a dashboard and the KPIs and reports of the respective section, they need the "Expert", "Professional" or "Observer" role in the respective module. Thus, to view the risk management dashboard, at least the "Professional" role in risk management is required.
Additional dashboards can also be created and configured. It is possible to make these accessible only to oneself by marking them as "private". Dashboards that are not marked as "private" are visible to all authorized members of the management system. Default dashboards, as in dashboards that are delivered with HITGuard by default, can be edited and reset into their original state, but not deleted. They are marked as vendor-specific dashboards with a "tool" icon. Self-created dashboards can be deleted.

Users can mark a dashboard as a favorite in each management system. This dashboard will be ranked first for the user and displayed when the user logs in. To mark it, click the star next to the dashboard configuration.
How to create and edit dashboards as well as information on the KPIs can be found here:
| Sections: | Create/edit dashboards | Risk management | ESG | Measures | Controls | Data protection | Case management | Audit management |
|---|
The reports that can be created on dashboards are the same as those in the respective menu items in terms of their content and their report options. The explanations for them are found on the help pages of the reports per menu item.
Reports on dashboards offer the following additional functions:
- Prepare multiple versions of one report: Just like KPIs, reports can be added to dashboards multiple times. The "filter" button allows you to save different configurations of the report options in order to then have access to various iterations of the same type of report at the click of a button.
- Example: A risk report called "Risk report - details", with details on measures and control definitions, the overview of the gaps assigned to the risk, and its temporal evolution; so that risk owners can periodically file a detailed status of their risks. And a risk report for the top managers called "Board risk report", containing just a rough overview of the open measures and active controls; for board members to get a grasp on the current risk treatment efforts.
- Set as default report settings: Experts and Professionals can save the option configuration of one report per report type on non-private dashboards (e.g. one risk report or one gross-net-risk report). In doing so, the report is then automatically generated with these settings from index pages (e.g. on the page Risk management → Risk evaluation, where there aren't any report options available). On the report page itself (e.g., Risk management → Reports → Risks → General) the report is also generated with these settings, but users can make individual changes to these settings. The report set as the default is marked with a star on top of the report icon.
- Example: user A configures a risk report on the dashboard and sets the settings as default. User B generates a risk report from the overview on the page Risk management → risk evaluation and the contents match the default settings. User C has already adjusted the settings the way they need them on the page Risk management → Reports → Risk → General. Their individual settings are not overwritten by the default. User D is using the page Risk management → Reports → Risk → General for the very first time and sees that the report options are set the same way as defined by User A's default.
Module-specific menu items
Right after the dashboard menu items, you find the module-specific menu items. Which modules are shown here depends on the user's authorizations as well as on the features activated for the management system.
AI features
HITGuard offers a multitude of possibilities of AI support across the application. In html-editable fields, meaning fields in which you can format the text, you find a "starlet" button with which you can call up AI functions. With the help of AI you can
- summarize,
- proofread,
- extend,
- shorten,
- change the style of,
- change the tone of,
- and translate texts between English and German.
Furthermore, you can ask AI questions using your own prompts and thus generate your own texts.
A special function is available in gap analyses, where the AI functions can be used in the non-html-editable field of the justification.
Help
Under this menu item you will find the introduction "Getting started", which gives an introduction to HITGuard's interface.
Under the menu item "Online Help" you will find our help directly integrated in HITGuard.
If there is an info icon in the lower left corner, it can be clicked to start a short introduction to the current page.
The letter: current management tasks
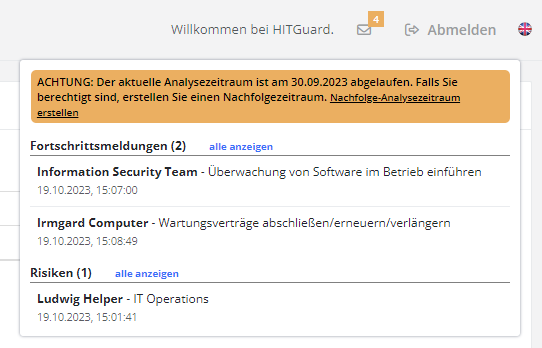
The envelope in the upper right corner informs professionals and experts about tasks that have been reported completed and are waiting for completion/review. The tasks always refer to the current management system only. Thre is also a notice if the current analysis period has expired.
In addition, the tasks are only displayed to users who are authorized to edit them. For example, answered processing activities are displayed only to users who are Data Protection professionals or experts and are currently in the Data Protection management system.
The tasks are divided into the following items:
| Section | Description |
|---|---|
| Progress reports | Progress reports for measures that have been answered. |
| Risks | Newly submitted or returned risks. |
| Protection needs analyses | Answered protection needs analyses. |
| Gap analyses | Answered gap analyses. |
| Tickets assigned to me | Open tickets that are assigned to you. Closed and answered tickets are not displayed. |
| Not assigned tickets | Tickets that have not yet been assigned an advisor. If a support team is configured, these tickets are only shown to members of that team. |
| Processing activities | Answered processing activities. |
User guides
FAQ
Glossary
Working with HITGuard
Experts or Professionals
Administrators or Experts
Administrators
External users
How To Start
- What are the first steps towards implementing a management system in HITGuard?
- Which first steps should I take to start working with the data protection module?
- Which first steps should I take to start working with the audit management module?
- Which first steps should I take to start working with the case management module?
- Which first steps should I take to start working with the doc management?
- Which first steps should I take to start working with the ESG module?
- Which first steps should I take to start working with the supplier risk management?
- How do I activate the various mailings after I've completed my initial tests?
Giudes and rough overview of the workflows
- What does the general workflow for measures look like?
- What does the general workflow for controls look like?
- What does the general workflow for reviews look like?
- What does the general workflow for processing activities look like?
- What does the general workflow for risk and opportunities look like?
- What does the general workflow for tickets look like?
- What does the general doc management workflow look like?
- How should I proceed if I want to perform a protection needs analysis?
Release Notes
| Year | Month | ||
|---|---|---|---|
| 2025 | April | August | |
| 2024 | March | August | December |
| 2023 | February | June | October |
| 2022 | January | June | October |
| 2021 | January | April | September |
| 2020 | April | July | October |
| 2019 | March, April | July | December |
Release Notes from the years 2017 and 2018 were directly integrated into the help.