Benutzer und Benutzerrollen/en: Unterschied zwischen den Versionen
Weitere Optionen
Faha (Diskussion | Beiträge) Keine Bearbeitungszusammenfassung |
Sala (Diskussion | Beiträge) Die Seite wurde neu angelegt: „=== Create user === There are three possibilities to create a user * Option 1: Create a user via the user list (for local logins without Active Directory). ::…“ |
||
| Zeile 5: | Zeile 5: | ||
User roles can be given seperately for every modul. The only exception is the practitioner, as this role is the same across every module. | User roles can be given seperately for every modul. The only exception is the practitioner, as this role is the same across every module. | ||
This means that a user can be an Expert in the Security Assessor (risk management), but Professional or Practitioner in the Progress Monitor (measures and controls). | This means that a user can be an Expert in the Security Assessor (risk management), but Professional or Practitioner in the Progress Monitor (measures and controls). | ||
'''Admin:''' | '''Admin:''' | ||
| Zeile 28: | Zeile 27: | ||
* Can carry out the access authorizations and basic configurations | * Can carry out the access authorizations and basic configurations | ||
* can manage the administration | * can manage the administration | ||
'''Professional:''' | '''Professional:''' | ||
| Zeile 49: | Zeile 47: | ||
== User Administration == | == User Administration == | ||
=== Create user === | |||
There are three possibilities to create a user | |||
* Option 1: Create a user via the user list (for local logins without Active Directory). | |||
:: Administration → Users | |||
:: In the user list, on the right margin, click on the button "Plus" to add a user. <br>Then you can create the user with the relevant data. | |||
::[[File:Benutzer anlegen.PNG|left|thumb|900px|600px|Create user]] | |||
::<br clear=all> | |||
:: "Search in directory service", is only displayed if LDAP is enabled in the global settings and an Active Directory is configured. This allows users to be searched from Active Directory and created with their data in HITGuard. | |||
:: Note for Azure Active Directory (AAD): | |||
::* Users that were already created before LDAP activation can be linked to their Azure Active Directory account afterwards. This allows to use Single-Sign-On (SSO). This can be done by each user under their profile. (see [[Special:MyLanguage/Profile|Profile]]) Administrators can also load current data from the AAD using a button to the right of the user name. This replaces different information from HITGuard. For this, however, the user must already be linked to an AAD account. | |||
* Option 2: Fast entry | |||
:: In the context of use, [[Special:MyLanguage/Global_Settings#ldap|Active Directory]] Integration, a new user with minimal permissions for the active module can be created via a person selection screen. | |||
:: To use this, type the person's name or abbreviation in a user selection box. This will load the user from the Active Directory. This user can then log in with his Active Directory data. | |||
# | |||
# | * Möglichkeit 3: Verwenden eines Active Directories | ||
:: Dies ist nur dann möglich, wenn ein [[Special:MyLanguage/Login_Möglichkeiten|Active Directory]] konfiguriert ist. | |||
# | :: Zuerst muss ein Benutzer, wie in Punkt 1 beschrieben wird, erstellen werden. Die angegebene E-Mail muss mit der seines Active Directory-User übereinstimmen. | ||
# | :: Anschließend kann sich der Benutzer mit seinem Active Directory-User anmelden, sofern dies in den globalen Einstellungen aktiviert ist. | ||
#: | |||
=== Benutzerrollen zuordnen === | |||
Benutzerrollen können nur von Administratoren oder Experten vergeben werden. | |||
Hierfür können Sie unter "Administration → Benutzerrollen-Zuordnung" für den gewünschten Benutzer die jeweiligen Rollen zuordnen. Administratoren können jede Rolle vergeben. Experten können alle Rollen bis auf Administrator und Compliance Manager vergeben. Verantwortlichen eines Managementsystems kann die Rolle "Expert" nicht entzogen werden solange sie für zumindest ein Managementsystem verantwortlich sind. | |||
<b>Wichtig:</b> Experten und Professionals müssen anschließend einem Managementsystem zugeteilt werden um ihre Aufgaben erfüllen zu können. (siehe [[Special:MyLanguage/Benutzer zu Managementsystemen zuteilen|Benutzer zu Managementsystemen zuteilen]]) | |||
[[Datei:Benutzerrollen.PNG|left|thumb|900px|Benutzerrollen-Zuordnung]] | |||
<br clear=all> | |||
=== Passwort ändern / zurücksetzen === | |||
<b>Achtung:</b> Das Ändern eines Passworts funktioniert nur, wenn die lokale Anmeldung aktiv ist. Das heißt: entweder es ist kein Active Directory konfiguriert oder die Lokale Anmeldung ist unter den Globalen Einstellungen aktiviert. | |||
Eigenes Passwort ändern: | |||
# Auf das Profilbild oder den Profilnamen → Profil klicken | |||
# unten rechts auf "Passwort ändern" klicken | |||
# altes und neues Passwort eingeben und bestätigen | |||
Als Administrator oder Expert ein Passwort ändern/zurücksetzen: | |||
# Unter Administration → Benutzer den gewünschten Benutzer auswählen | |||
# unten rechts auf "Passwort ändern" klicken | |||
# neues Passwort eingeben und bestätigen | |||
: <b>Zu Beachten:</b> Nur Administratoren können Passwörter von Experten zurücksetzen. Experten können User anlegen und berechtigen und sie können Passwörter für Professionals und Practitioner zurücksetzen. Die Administrator-Rolle kann auch an mehrere User vergeben werden. | |||
Version vom 18. Januar 2021, 17:44 Uhr
User-roles in HITGuard
Each user role has its own permissions and functions.
User roles can be given seperately for every modul. The only exception is the practitioner, as this role is the same across every module.
This means that a user can be an Expert in the Security Assessor (risk management), but Professional or Practitioner in the Progress Monitor (measures and controls).
Admin:
This role is responsible for administration as well as for managing other users. Administrators have no insight into data. So, although administrators can manage and create all management systems, they do not have access to their data, nor can they be defined as responsible persons.
- At the first installation of the software at least one administrator must be defined.
- There can be several administrators.
- Performs purely administrative tasks.
Expert:
In this role you will be responsible for one or more management systems in your company.
- Security Assessor (Risk Management):
- Can conduct evaluations, assess risk and also administer findings.
- Responsible for the administration of risk policy
- Progress Monitor (measures and controls)
- Can create and administer measures and controls.
- Is responsible for the administration of settings in the progress monitor
- Data Protector ( Privacy)
- Can create processing activities, assign TOMs, administer external parties and data subjects
- Can create and manage management systems
- Can carry out the access authorizations and basic configurations
- can manage the administration
Professional:
Users of this role support the experts of the management systems in fulfilling their tasks. A Professional has access to all tasks in the management systems to which he is assigned, but has limited editing rights.
- Security Assessor (Risk Management):
- Can conduct evaluations, determine risks and also administer findings.
- Progress Monitor (measures and controls)
- Can create and administer measures and controls.
- Data Protector (Privacy)
- Can create processing activities, assign TOMs and manage externals
Practitioner:
This role has detailed information and implementation competencies that are required from the management system. It is essential that practitioners share their knowledge with the HITGuard experts in order to have a functioning management system.
- has an overview of all his assigned measures, controls, processing activities and assessments to answer
- is reminded to carry out his duties
- is the default role that each user has across all modules.
User Administration
Create user
There are three possibilities to create a user
- Option 1: Create a user via the user list (for local logins without Active Directory).
- Administration → Users
- In the user list, on the right margin, click on the button "Plus" to add a user.
Then you can create the user with the relevant data. 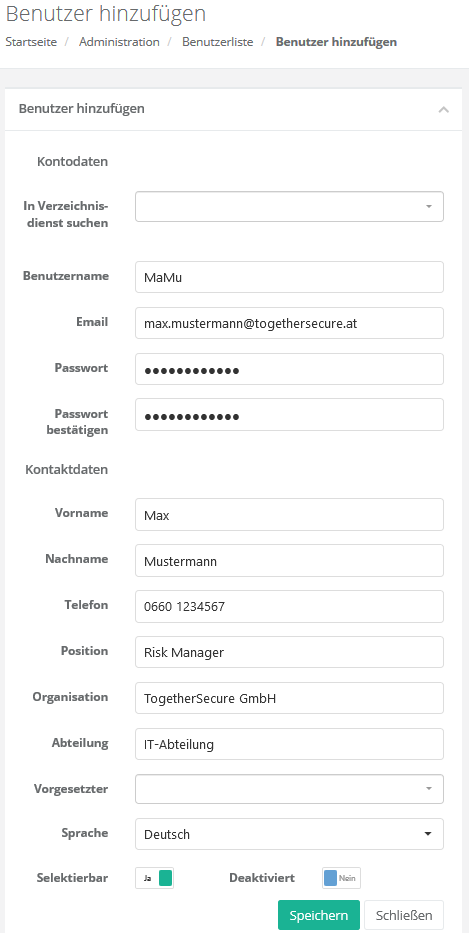
Create user - "Search in directory service", is only displayed if LDAP is enabled in the global settings and an Active Directory is configured. This allows users to be searched from Active Directory and created with their data in HITGuard.
- Note for Azure Active Directory (AAD):
- Users that were already created before LDAP activation can be linked to their Azure Active Directory account afterwards. This allows to use Single-Sign-On (SSO). This can be done by each user under their profile. (see Profile) Administrators can also load current data from the AAD using a button to the right of the user name. This replaces different information from HITGuard. For this, however, the user must already be linked to an AAD account.

- Option 2: Fast entry
- In the context of use, Active Directory Integration, a new user with minimal permissions for the active module can be created via a person selection screen.
- To use this, type the person's name or abbreviation in a user selection box. This will load the user from the Active Directory. This user can then log in with his Active Directory data.
- Möglichkeit 3: Verwenden eines Active Directories
- Dies ist nur dann möglich, wenn ein Active Directory konfiguriert ist.
- Zuerst muss ein Benutzer, wie in Punkt 1 beschrieben wird, erstellen werden. Die angegebene E-Mail muss mit der seines Active Directory-User übereinstimmen.
- Anschließend kann sich der Benutzer mit seinem Active Directory-User anmelden, sofern dies in den globalen Einstellungen aktiviert ist.
Benutzerrollen zuordnen
Benutzerrollen können nur von Administratoren oder Experten vergeben werden.
Hierfür können Sie unter "Administration → Benutzerrollen-Zuordnung" für den gewünschten Benutzer die jeweiligen Rollen zuordnen. Administratoren können jede Rolle vergeben. Experten können alle Rollen bis auf Administrator und Compliance Manager vergeben. Verantwortlichen eines Managementsystems kann die Rolle "Expert" nicht entzogen werden solange sie für zumindest ein Managementsystem verantwortlich sind.
Wichtig: Experten und Professionals müssen anschließend einem Managementsystem zugeteilt werden um ihre Aufgaben erfüllen zu können. (siehe Benutzer zu Managementsystemen zuteilen)

Passwort ändern / zurücksetzen
Achtung: Das Ändern eines Passworts funktioniert nur, wenn die lokale Anmeldung aktiv ist. Das heißt: entweder es ist kein Active Directory konfiguriert oder die Lokale Anmeldung ist unter den Globalen Einstellungen aktiviert. Eigenes Passwort ändern:
- Auf das Profilbild oder den Profilnamen → Profil klicken
- unten rechts auf "Passwort ändern" klicken
- altes und neues Passwort eingeben und bestätigen
Als Administrator oder Expert ein Passwort ändern/zurücksetzen:
- Unter Administration → Benutzer den gewünschten Benutzer auswählen
- unten rechts auf "Passwort ändern" klicken
- neues Passwort eingeben und bestätigen
- Zu Beachten: Nur Administratoren können Passwörter von Experten zurücksetzen. Experten können User anlegen und berechtigen und sie können Passwörter für Professionals und Practitioner zurücksetzen. Die Administrator-Rolle kann auch an mehrere User vergeben werden.