Zusammenführen von Wissensdatenbanken/en: Unterschied zwischen den Versionen
Weitere Optionen
Übernehme Bearbeitung einer neuen Version der Quellseite |
Isan (Diskussion | Beiträge) Keine Bearbeitungszusammenfassung |
||
| (9 dazwischenliegende Versionen desselben Benutzers werden nicht angezeigt) | |||
| Zeile 50: | Zeile 50: | ||
[[Datei:WDB Erklärung Symbole.png|left|thumb|800px|Description of the various icons]]<br clear=all> | [[Datei:WDB Erklärung Symbole.png|left|thumb|800px|Description of the various icons]]<br clear=all> | ||
* | * Removed element from context: | ||
:: | :: This icon means that the assignment of the element was removed (e.g., the question is no longer assigned to the topic). | ||
* | * Existing element newly added to context: | ||
:: | :: This icon means that an element that already existed in the older version was newly assigned in the respective spot in the newer version. | ||
* | * Moved: | ||
:: | :: This icon means that an element that was already assigned somewhere in the older version is now assigned to a different element (e.g., a question becomes a subquestion of a superordinate question). Clicking the symbol takes you to the point to which the element was moved and vice versa. | ||
* | * New element added to context: | ||
:: | :: This icon means that an element that did not exist in the older version was assigned to a different element. | ||
* | * Removed element: | ||
:: | :: This icon means that an element that existed in the older version no longer exists in the new version. | ||
* | * Confirm/reject change: | ||
:: | :: These buttons allow you to decide whether you want to confirm or reject a change made to the assignments from the older to the newer version. | ||
* | * Topic/question/threat/measure/control/justification template: | ||
:: | :: These icons show which element is which. | ||
===Merge=== | ===Merge=== | ||
To merge the versions, it must be decided for each element on the rigth side, if and where from it is to be adopted. Then, decide on the left side what is to happen to the assignment. Once this is done, click the "Next" button in the bottom right corner. Saving is only possible once all decisions have been made. | |||
[[Datei:WDB Zusammenführen S1.png|left|thumb|800px|Merging step 1]]<br clear=all> | [[Datei:WDB Zusammenführen S1.png|left|thumb|800px|Merging step 1]]<br clear=all> | ||
You should move from element to element via the "Next" button. For this to work correctly, you must first make all decisions for the superordinate questions of a topic. Click the "Next" button after each element! If you have done this properly, the wizard will automatically jump to the first subquestion of the first superordinate question after all decisions have been made for the superordinate questions. | |||
[[Datei:WDB Zusammenführen S2 Entscheidungen Oberfragen.png|left|thumb|800px|Merging step 2]]<br clear=all> | [[Datei:WDB Zusammenführen S2 Entscheidungen Oberfragen.png|left|thumb|800px|Merging step 2]]<br clear=all> | ||
Now, make all decisions for the subquestions. If measures, controls, justification templates, or threats have been assigned to a subquestion, these are also accessed by clicking on the "Next" button. | |||
[[Datei:WDB Zusammenführen S3 Unterelemente.png|left|thumb|800px|Merging step 3]]<br clear=all> | [[Datei:WDB Zusammenführen S3 Unterelemente.png|left|thumb|800px|Merging step 3]]<br clear=all> | ||
If the behavior of the subquestion is changed between versions (e.g., the "shown if" options are modified), the behavior to be adopted can be chosen on the right side. | |||
[[Datei:WDB Zusammenführen S4 Unterfrage Optionen.png|left|thumb|800px|Merging: options for subquestions]]<br clear=all> | [[Datei:WDB Zusammenführen S4 Unterfrage Optionen.png|left|thumb|800px|Merging: options for subquestions]]<br clear=all> | ||
If you have clicked the "Next" button until all topics have been touched, you are then shown all elements that exist in the new version but have not been assigned. | |||
[[Datei:WDB Zusammenführen S4 Elemente ohne Zuordnung.png|left|thumb|800px|Merging step 4: elements without assignment]]<br clear=all> | [[Datei:WDB Zusammenführen S4 Elemente ohne Zuordnung.png|left|thumb|800px|Merging step 4: elements without assignment]]<br clear=all> | ||
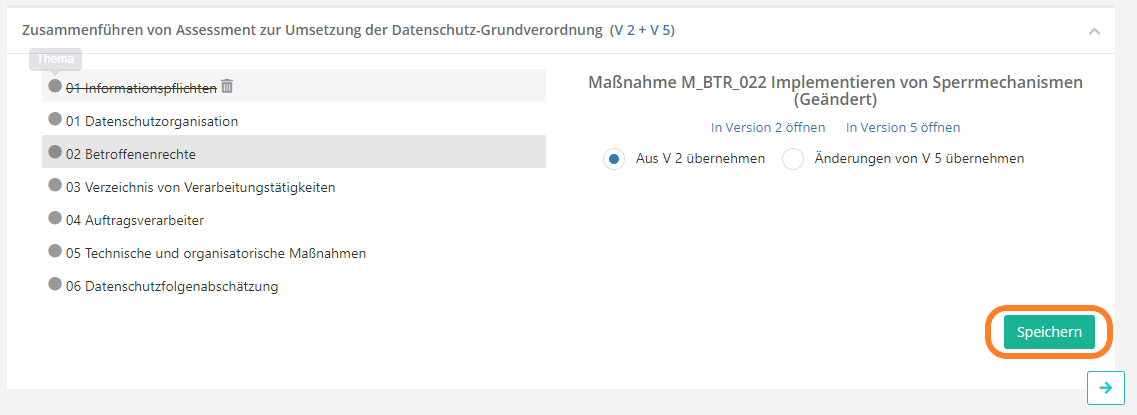
Once all decisions have been made, you can create the new, merged knowledge base with the "Save" button. | |||
[[Datei:WDB Zusammenführen S6 Speichern.png|left|thumb|800px|Merging step 5: Save]]<br clear=all> | [[Datei:WDB Zusammenführen S6 Speichern.png|left|thumb|800px|Merging step 5: Save]]<br clear=all> | ||
Aktuelle Version vom 18. August 2022, 10:01 Uhr
When merging knowledge bases, a new version is created based on two existing versions.
The elements of the new version (topics, questions, threats,...) originate from one of the two initial versions. The source of the knowledge base element can be individually chosen for each element added to the merged version.
A typical use case for merging is having created an adaptation of an imported vendor knowledge base.
When the vendor releases a new version of the knowledge base, it is likely that a user does want to adopt these changes but also wants to keep their adaptations at the same time.
For this to be achieved, the adapted version can be merged with the new vendor version. Then the adaptations don't need to be made all over again in the new version.
Prerequisites for merging
- It is not possible to merge different knowledge bases. Only different versions of the same knowledge base can be merged.
- Only published versions of a knowledge base can be merged.
- Versions can only be merged with others, if the most recent version is published. Meaning, if version 1 and 2 are published and version 3 exists but has not yet been published, it is not possible to either merge 1 and 2 nor 2 and 3. If version 3 is published, then 1 and 2, 1 and 3, and 2 and 3 can be merged. The merged version is automatically set as the latest version, meaning that these three options would result in the creation of version 4.
- It is only possible to merge versions with superseding versions. Meaning, V1 can be merged with V4, but not the other way around.
Merge knowledge bases
You find the form for merging knowledge bases under "Administration → Knowledge bases → Knowledge base merging". Here, you first choose which knowledge base you want to merge. Then, choose which versions you want to merge. Clicking the "Start merging" button takes you to the wizard.

Explanation of the wizard
When merging two versions of a knowledge base, you must first decide for each element, if it is to be incorporated and, if so, from which source version. Only then can you decide if you want to adopt the structuring of the newer version or keep that of the older one. When you confirm the content (right side), for example a newly created review question from the newer version is added to the list of review question. However, it is only assigned to a topic, if and when the assignment is confirmed on the left side.
The wizard is thus structured as two areas. The decision of how to deal with the content of an element is made on the right side. The decision of how to structure the topics and how to handle the assignments of review questions and their further elements is made on the left.
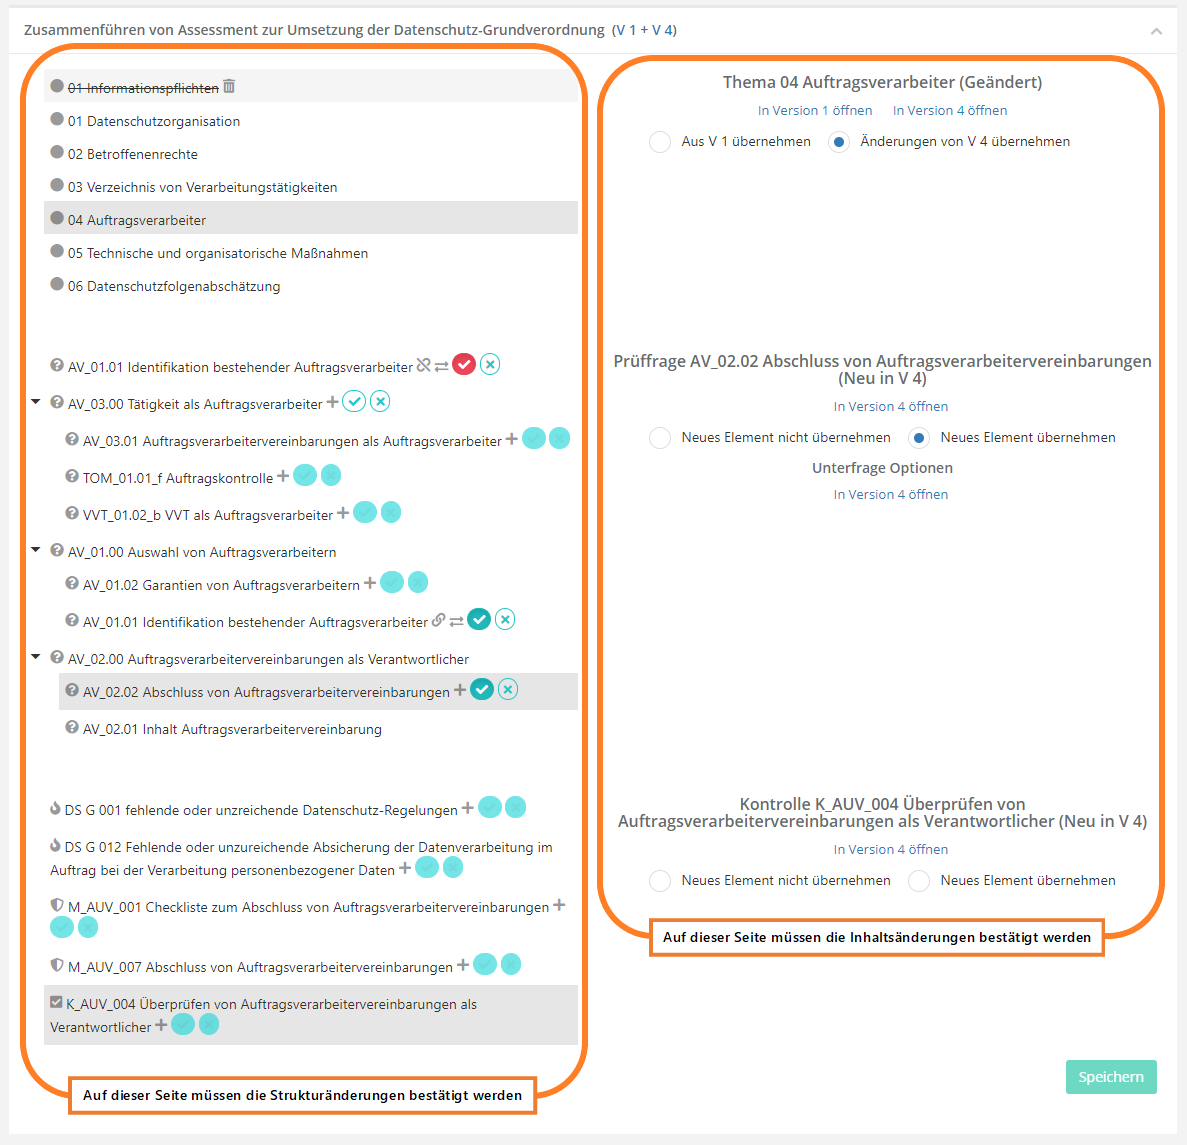
Right side:
On the right side, you decide whether the element shown on the left is to be adopted from the older or the newer version in terms of its content, and whether a completely new element from the newer version is to be adopted into the merged knowledge base. The wizard also weights the significance of the change and offers cues about which changes might require a revaluation of a review, such as the change of the posing of a review question.
Left side:
The left side shows how the structure of topics and the assignment of questions has changed from one version to the next. Meaning, it shows how topics and their assigned questions as well as questions with their assigned element have changed from the older to the newer version.
On this page, you decide from which version the structure of topics and the assignment of questions is to be taken. This decision must be made for every element individually. Note that if you do not confirm the assignment of the superordinate element, then only the content and not the structure can be adopted from the subordinate element.
In order to make any decisions on this side, you first have to confirm on the right side what is to happen to the content. Only then do the decision options become available.
Explanation of the icons
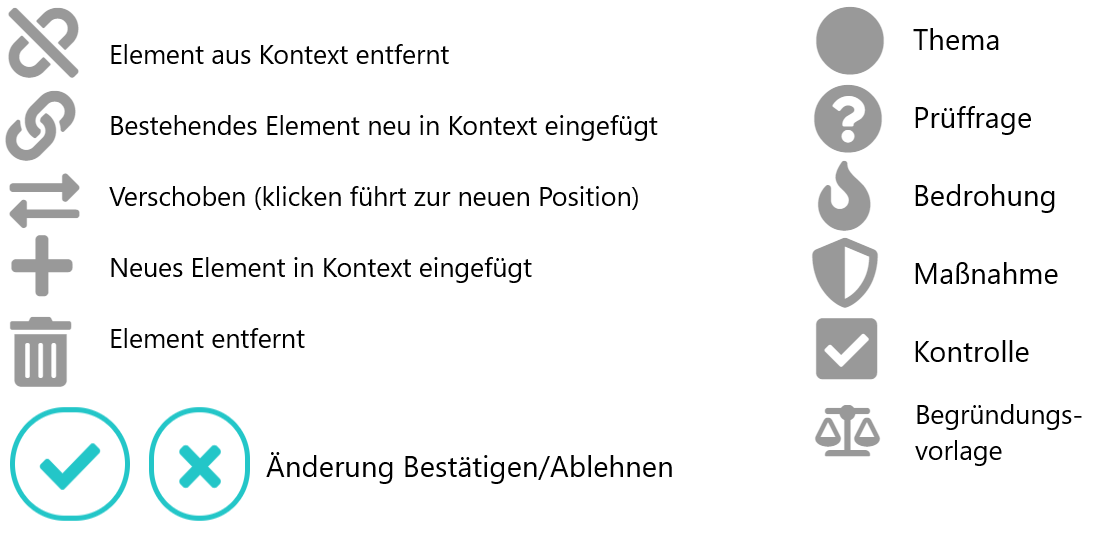
- Removed element from context:
- This icon means that the assignment of the element was removed (e.g., the question is no longer assigned to the topic).
- Existing element newly added to context:
- This icon means that an element that already existed in the older version was newly assigned in the respective spot in the newer version.
- Moved:
- This icon means that an element that was already assigned somewhere in the older version is now assigned to a different element (e.g., a question becomes a subquestion of a superordinate question). Clicking the symbol takes you to the point to which the element was moved and vice versa.
- New element added to context:
- This icon means that an element that did not exist in the older version was assigned to a different element.
- Removed element:
- This icon means that an element that existed in the older version no longer exists in the new version.
- Confirm/reject change:
- These buttons allow you to decide whether you want to confirm or reject a change made to the assignments from the older to the newer version.
- Topic/question/threat/measure/control/justification template:
- These icons show which element is which.
Merge
To merge the versions, it must be decided for each element on the rigth side, if and where from it is to be adopted. Then, decide on the left side what is to happen to the assignment. Once this is done, click the "Next" button in the bottom right corner. Saving is only possible once all decisions have been made.
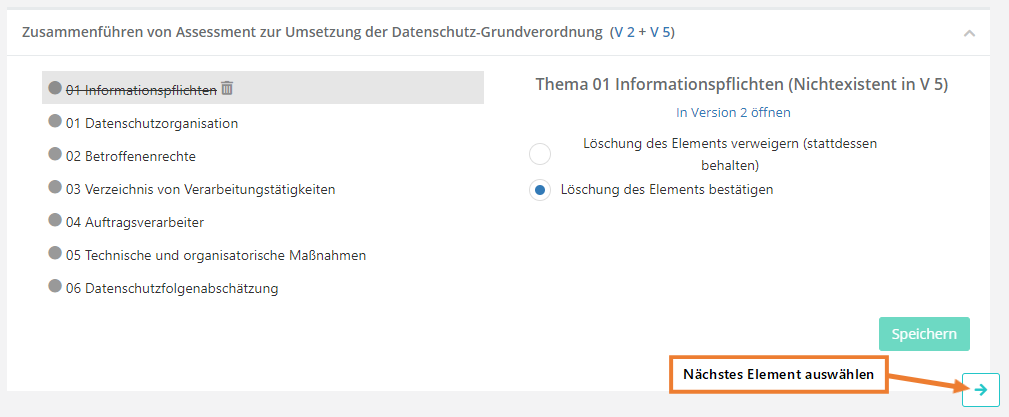
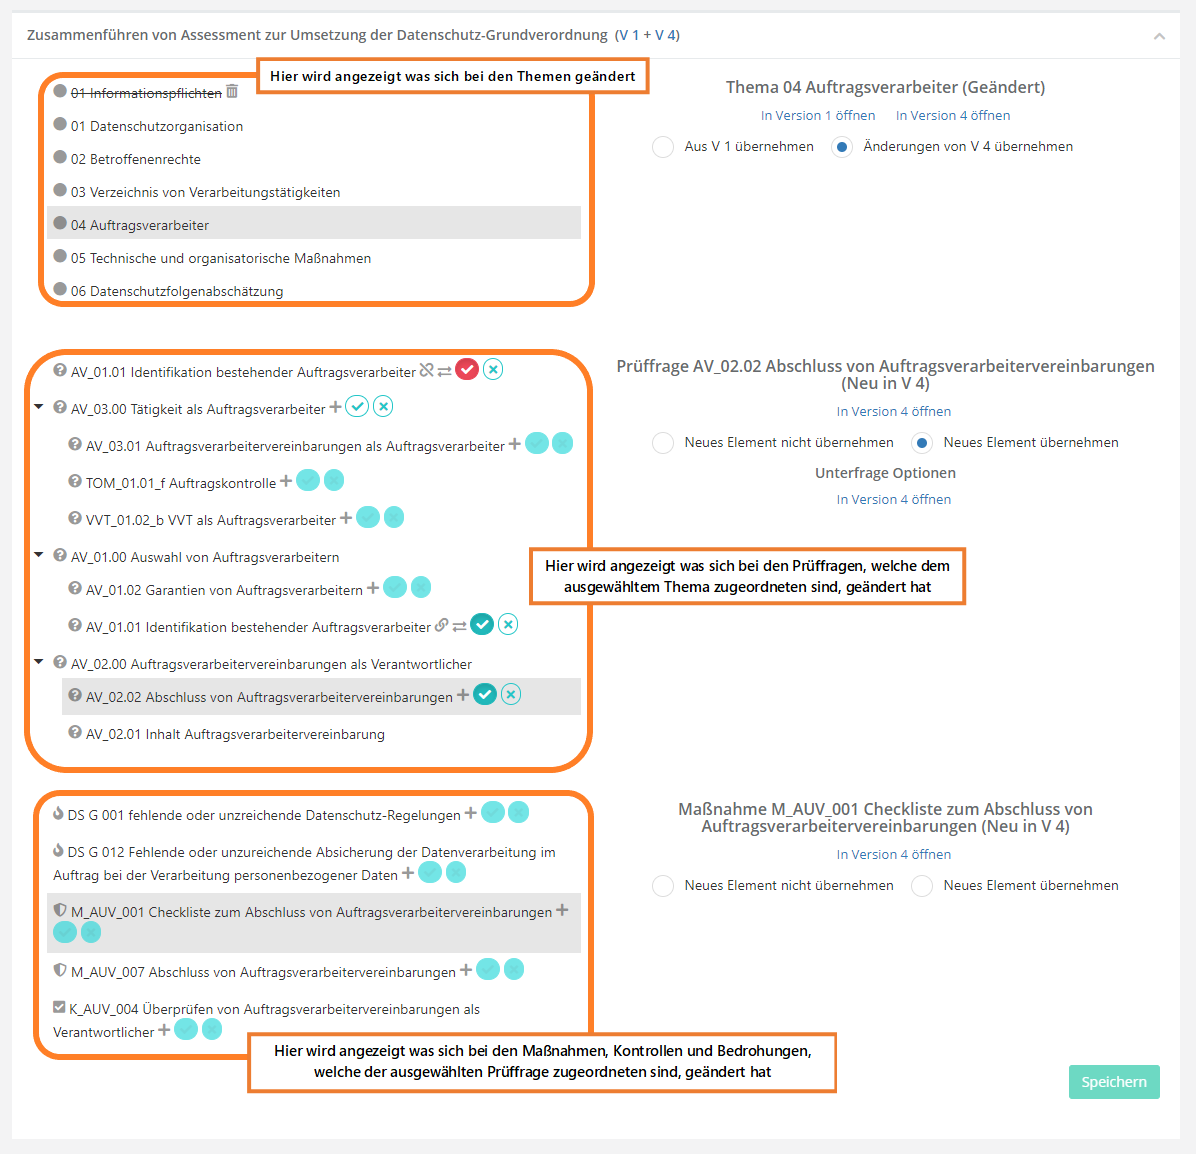
You should move from element to element via the "Next" button. For this to work correctly, you must first make all decisions for the superordinate questions of a topic. Click the "Next" button after each element! If you have done this properly, the wizard will automatically jump to the first subquestion of the first superordinate question after all decisions have been made for the superordinate questions.
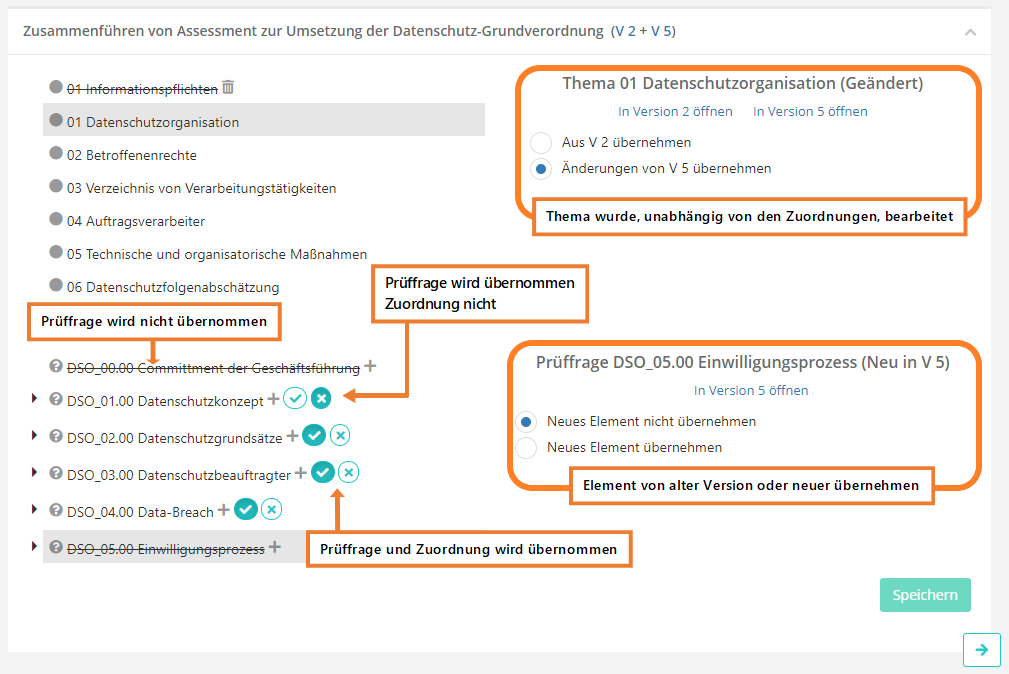
Now, make all decisions for the subquestions. If measures, controls, justification templates, or threats have been assigned to a subquestion, these are also accessed by clicking on the "Next" button.
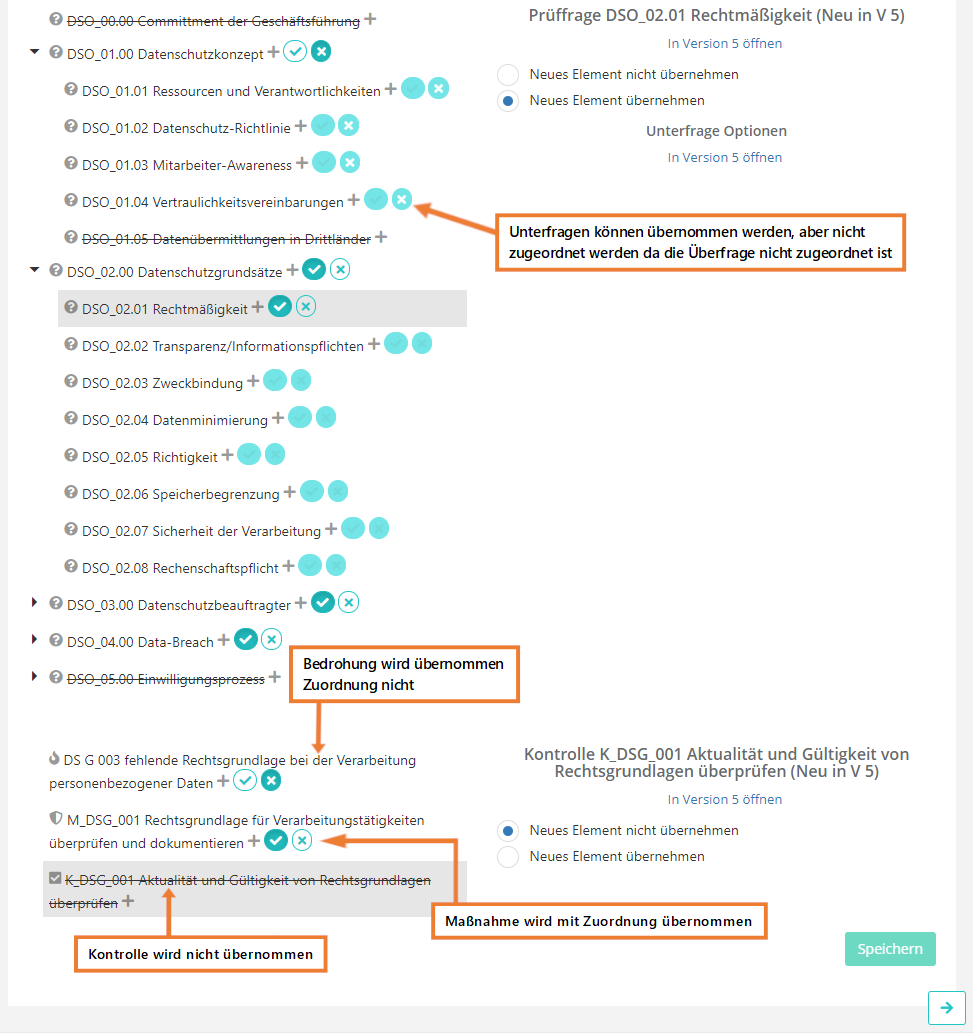
If the behavior of the subquestion is changed between versions (e.g., the "shown if" options are modified), the behavior to be adopted can be chosen on the right side.
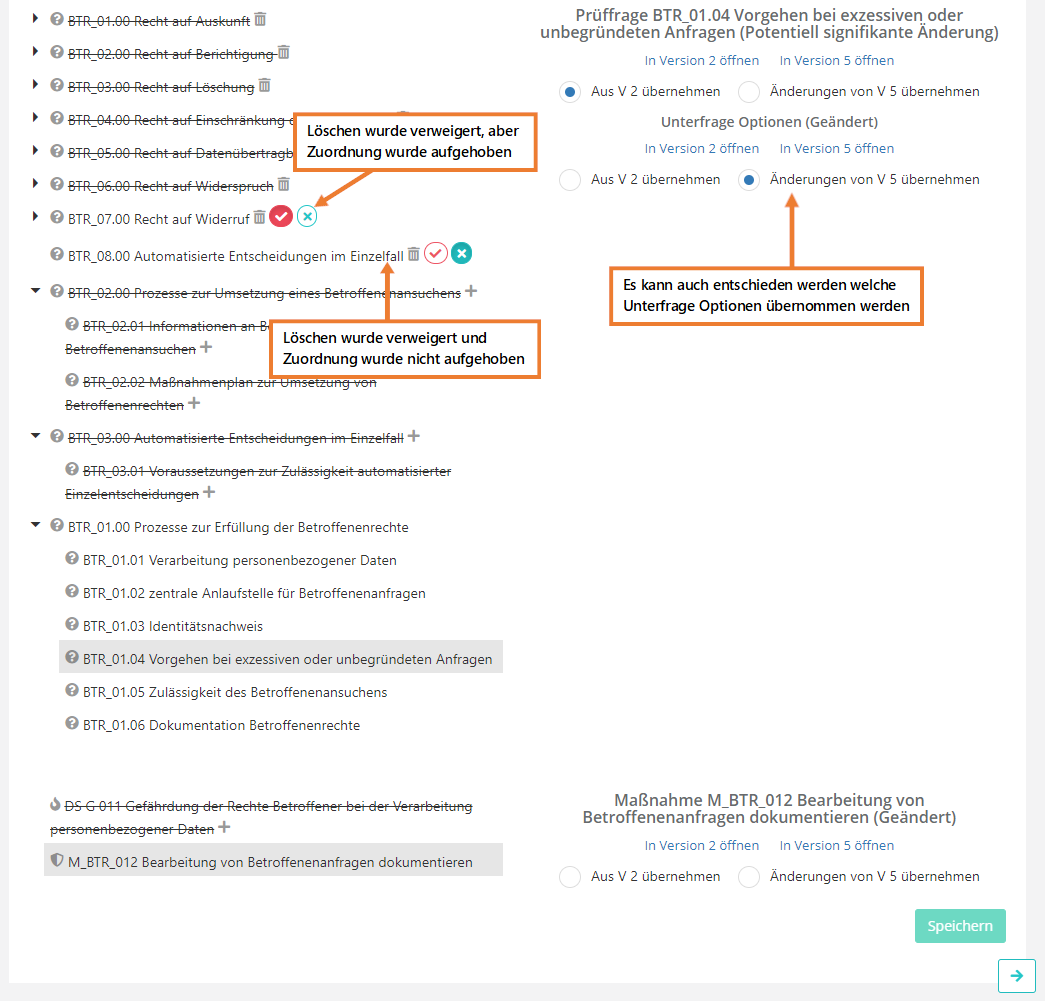
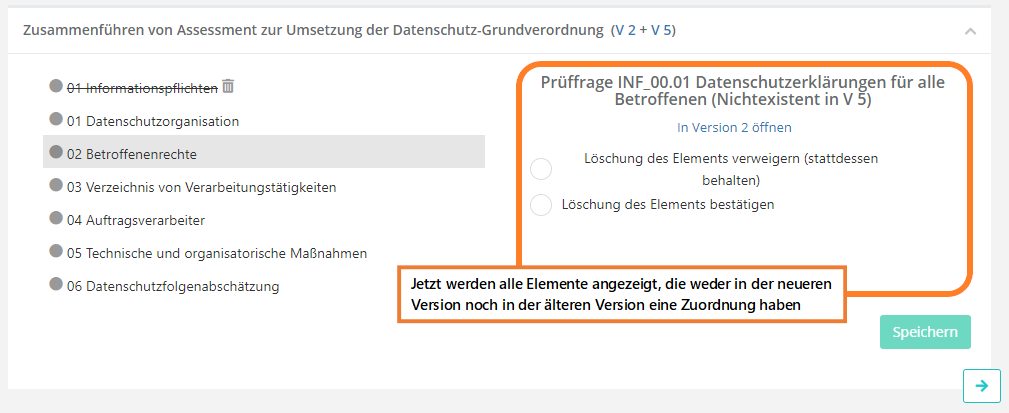
If you have clicked the "Next" button until all topics have been touched, you are then shown all elements that exist in the new version but have not been assigned.
Once all decisions have been made, you can create the new, merged knowledge base with the "Save" button.
