Erstellen einer Wissensdatenbank/en: Unterschied zwischen den Versionen
Weitere Optionen
Isan (Diskussion | Beiträge) Die Seite wurde neu angelegt: „Creating a knowledge base“ |
Übernehme Bearbeitung einer neuen Version der Quellseite |
||
| (170 dazwischenliegende Versionen von 3 Benutzern werden nicht angezeigt) | |||
| Zeile 1: | Zeile 1: | ||
<span id="create_wdb"></span> | <span id="create_wdb"></span> | ||
TogetherSecure creates and provides knowledge bases. Also, any user with the expert role in risk management is able to create a new knowledge base or modify an existing one. In other words, a a knowledge base can be created or changed by any expert. | |||
This means, experts can add and hierarchically sort topics. Topics are then assigned review questions, either newly created or from an existing pool of questions. In the next step, threats, justification templates, measures, and/or controls can be created or assigned from existing ones. If, for example, a knowledge base already includes measures and controls (as is the case with BSI IT-Grundschutz), that means appropriate measures and controls have already been thought up for the offered threats. Users are encouraged, however, to evaluate their respective scenarios and create additional measures and/or controls for the treatment of the threats. | |||
== | <span id="Wissensdatenbank_erstellen/bearbeiten"></span> | ||
== Create/edit knowledge base == | |||
To create or edit a knowledge base, navigate to "Administration → Knowledge bases". | |||
Here, all knowledge bases are listed, whether they have been published or not. Only published knowledge bases can be used for reviews. Published knowledge bases are marked with a green tick. If there are multiple versions of a knowledge base, one can be declared the default version (see: edit). It is then marked with a red heart. | |||
''' | '''Create:'''<br> | ||
* | * To create a new knowledge base, click the "Create new knowledge base" button. Then, enter the header information, create topics and their review questions, and finally assign measures, controls, justification templates, and threats.<br> | ||
[[Datei:WDB Wissensdatenbanken.png|left|thumb|901px| | [[Datei:WDB Wissensdatenbanken.png|left|thumb|901px|Tab knowledge bases]]<br clear=all> | ||
''' | '''Edit:'''<br> | ||
* | * To edit a KB, click on the desired KB. Published knowledge bases are read-only and can therefore no longer be modified. If a KB has been published, you need to create a superseding version or a user adaptation (of a vendor knowledge base). In the same interface, you can also set a KB as the default version if multiple versions of the KB exist. <br> | ||
* | * The superseding version is unpublished and can therefore be edited. | ||
[[Datei:WDB Maske Wissensdatenbank bearbeiten.png|left|thumb| | [[Datei:WDB Maske Wissensdatenbank bearbeiten.png|left|thumb|900px|Interface of a published knowledge base]]<br clear=all> | ||
=== | <span id="Kopfdaten"></span> | ||
=== Header information === | |||
---- | ---- | ||
In | In the header data, briefly describe the purpose of the knowledge base. Depending on whether it is a self developed knowledge base or one for a norm, you need to set the type accordingly, set the effective date, and add the creator (e.g. name or company). Caution: only KBs of the types vendor or norm or standard can be exported. | ||
<b> | <b>Type vendor and norm or standard</b> | ||
To create KBs of the type vendor or norm or standard, you need to have a vendor license! These KBs are also the only ones that can be exported. | |||
[[Datei:WDB Kopfdaten.PNG|left|thumb| | [[Datei:WDB Kopfdaten.PNG|left|thumb|901px|Header data when creating a KB]]<br clear=all> | ||
=== <span id="topi"></span> | In self-developed knowledge bases, you can use the checkboxes to configure whether the short version of the copyright is to be displayed/printed in the review assistant and with the review question in a report. | ||
<span id="Themen"></span> | |||
=== <span id="topi"></span>Topics === | |||
---- | ---- | ||
Here, all the topics that are part of the KB are listed hierarchically. The purpose of topics is to give knowledge bases a meaningful structure. | |||
<span id="Thema_erstellen/bearbeiten"></span> | |||
==== '''Create/edit topic''' ==== | |||
To create a new topic, navigate to the tab "Topics" and click on "create new topic". Then fill out the displayed form. | |||
[[Datei:WDB neues Thema erstellen.png|left|thumb|900px|Create new topic]]<br clear=all> | |||
[[Datei:WDB | [[Datei:WDB Maske Thema erstellen.PNG|left|thumb|902px|Form for creating a new topic]]<br clear=all> | ||
:<u>Numbering and title:</u> Here, set the numbering and the title. The numbering should help clarify the KB's structure, e.g. 1, 1.1, 1.2, etc. The title should be informative, so the user immediately knows what questions the topic covers. <u>Note:</u> The topics are automatically sorted alphabetically or in ascending numerical order, respectively. With a larger number of numbered topics, it is advisable to use a leading zero in order to have the sorting order match expectations (e.g., 01, 02, 03 ... 10, 11, etc.). | |||
:<u> | :<u>Description:</u> Here, describe the purpose of the topic. This text field supports HTML formatting. | ||
:<u> | :<u>Supporting documents:</u> Here, record references or links to documents that might be relevant for the preparation of auditing this topic. If the topic is used in a review by knowledge base, the supporting documents are shown in the review assistant. The supporting documents are also printed with the respective review object in audit and review reports. | ||
:<u> | :<u>Parent topic:</u> If the topic is a subordinate one, the parent topic has to be set here so the KB is structured properly. | ||
<!-- NO TRANSLATION | |||
<!-- | |||
NO TRANSLATION | |||
NO TRANSLATION --> | |||
:<u> | :<u>Effective date:</u> This should be the date of the latest revision. | ||
==== ''' | <span id="Prüffragen_zuordnen"></span> | ||
==== '''Assign review questions''' ==== | |||
Once you have created a topic, you need to assign it questions. For this, you may use existing review questions or [[#Prüffrage erstellen, bearbeiten und löschen|create new questions]]. When the question is assigned, you should in turn also [[#Maßnahmen, Kontrollen und Bedrohungen zu Prüffragen zuordnen|assign measures, controls, and threats to the question]]. | |||
Normally, the review questions are sorted according to the sort order (hidden column). This is also the order in which they are listed in gap analyses. The arrows next to the plus button can be used to adjust the sort order of the review questions. | |||
[[Datei:WDB | [[Datei:WDB Prüffragen zuordnen.png|left|thumb|900px|Navigation: assign review questions to the topic]]<br clear=all> | ||
[[Datei:WDB existierende Prüffragen zuordnen.PNG|left|thumb|900px|Form for assigning existing questions]]<br clear=all> | |||
<span id="Unterfragen_konfigurieren"></span> | |||
==== '''Configure sub-questions''' ==== | |||
To sort review questions hierarchically, double-click the questions you want to be subordinates and choose a parent question for them (only one layer is supported, meaning a sub-question cannot have further sub-questions). Then, you can choose how the sub-question is to behave depending on the parent question's answer. | |||
[[Datei:WDB | [[Datei:WDB Prüffragen hierarchie.PNG|left|thumb|900px|Example: review question hierarchy]]<br clear=all> | ||
[[Datei:WDB Unterfrage konfigurieren.png|left|thumb|900px|Example: configure sub-question]]<br clear=all> | |||
In reports, structural questions are formatted in italics and their corresponding sub-questions are indented below them. | |||
Maßnahmen | <span id="Maßnahmen,_Kontrollen,_Begründungsvorlagen_und_Bedrohungen_zu_Prüffragen_zuordnen_und_bearbeiten"></span> | ||
==== <span id="posmeas"></span>'''Assign and edit measures, controls, justification templates, and threats''' ==== | |||
Measures and controls that have been assigned to a review questions are suggested during risk treatment, if their question shows a gap during an assessment. Justification templates can be used as a justification for an answer. If threats are assigned, the question is listed with the threats for analysis purposes. | |||
'''assign or create:''' | |||
*The forms for assigning existing measures, controls, justification templates, and threats are the same as the one for assigning review questions, with the exception of the actual content. | |||
*To create see [[#Maßnahme erstellen, bearbeiten und löschen|create measure]], [[#Kontrolle erstellen, bearbeiten und löschen|create control]], [[#Begründungsvorlage erstellen, bearbeiten und löschen|create justification template]], and [[#Bedrohung erstellen, bearbeiten und löschen|create threat]]. | |||
[[Datei:WDB Prüffrage M K B zuordnen.png|left|thumb|901px|Assign measures, controls, and threats to review question]]<br clear=all> | |||
'''edit and remove assignment:''' | |||
*As shown above, double-click an element to open its editing interface and edit its properties. Here, you can also remove the assignment to the review question. | |||
[[Datei:WDB Maßnahme bearbeiten.png|left|thumb|903px| | [[Datei:WDB Maßnahme bearbeiten.png|left|thumb|903px|Form for editing a control]]<br clear=all> | ||
=== <span id="ques"></span> | <span id="Prüffragen"></span> | ||
=== <span id="ques"></span>Review questions === | |||
---- | ---- | ||
This tab shows a list of all review questions that exist in the KB. However, they do not show a hierarchy here, this is only displayed under the topics. This tab also lets you create new review questions. | |||
[[Datei:WDB Prüffragen.png|left|thumb|900px|KB tab Questions]]<br clear=all> | |||
<span id="Prüffrage_erstellen,_bearbeiten_und_löschen"></span> | |||
==== '''Create, edit, and delete a review question''' ==== | |||
To create a review question, click the "Create new question" button shown above. | |||
To edit or delete a question, double-click the desired question. Then the question can be edited or deleted (via the "trash can" icon). The behaviour of sub-questions can only be changed in the topics tab. | |||
'''Properties:''' | |||
*<u>Numbering and title:</u> The numbering should be logical and comprehensible, e.g. an abbreviation of the topic and a serial number (DSO_01.00). The title should be informative, so the user immediately knows what the question is about. | |||
*<u> | *<u>Question:</u> Pose a clearly formulated question here. | ||
*<u> | *<u>Description:</u> If necessary, further describe the question here. For example, you might describe the basic conditions that need to be fulfilled for a question to be answered positively. | ||
<!-- NO TRANSLATION --> | |||
*<u>Hint for auditors:</u> Information for auditors can be recorded here. This could, for instance, be links to documents the answers should be compared to, or a checklist with the exam steps. This information is only shown in gap analyses that have been opened either in "Risk management → Vulnerabilities" or from an audit. (It is not displayed if the analysis has been opened in the context of "My tasks".) | |||
*<u> | |||
*<u> | *<u>Type of question:</u> Choose whether it is a technical or a process question, or an information gathering. Technical questions are answered with Yes, No, or Partly and process questions with a maturity level from 0 to 5. | ||
::<u>Note</u>: Information gatherings in reviews are seen as answered if the comment was filled in and/or at least one file was uploaded as evidence. | |||
: | |||
*<u> | *<u>Answer types and unnecessary:</u> This option allows you to limit the answer types for the question. This is only possible for technical questions. The option "unnecessary" dictates whether a question has to be answered or not. Note that setting a structural question as unnecessary will affect its sub-questions, as their behaviour in response to an unnecessary structural question can be configured. Information gatherings are not subject to evaluation, but can be marked as Unnecessary. | ||
*<u>Assigned protection targets and weightings (not for information gatherings):</u><br> | |||
*<u> | :: Choose, which protection targets are affected if a question reveals a gap.<br>Example: | ||
:: | :::Review question about server room security | ||
:::*Has the door been furnished with a security lock? | |||
:::If this question is answered No, major risks concerning confidentiality, integrity, and availability can develop. | |||
::: | |||
:::* | |||
::: | |||
:::{| class="wikitable" | :::{| class="wikitable" | ||
|- | |- | ||
! | ! Protection target !! weighting!! explanation | ||
|- | |- | ||
| | | Confidentiality | ||
|style="text-align:center;"| 4 | |style="text-align:center;"| 4 | ||
| | | break-in and theft of a hard-drive | ||
|- | |- | ||
| | | Availability | ||
|style="text-align:center;"| 4 | |style="text-align:center;"| 4 | ||
| | | the burglar could destroy something | ||
|- | |- | ||
| | | Integrity | ||
|style="text-align:center;"| 3 | |style="text-align:center;"| 3 | ||
| | | the burglar could make changes to a system | ||
|} | |} | ||
*<u>Norm | *<u>Norm mapping:</u> If the question touches one or more norm chapters, this should be recorded here. This allows the creation of a compliance report for a norm. | ||
*<u> | *<u>Effective date:</u> The effective date should be the date of creation or that of the latest revision. | ||
*<u> | *<u>Author's notes:</u> Clicking "Add note" allows the author to record a note for themselves. They could, for example, add to-dos or links to external sources. This information is only visible for the editor of a KB. It has no effect on assessments and is of a purely editorial nature. It is also not exported or imported with a KB. | ||
*<u>ID | *<u>External ID:</u> With this ID a review question can be updated through an import. For this, the ID needs to match the ID of the review question in the import. This field should only be set manually if the review question originates in an external system but the questions were created manually before the import and are now to be kept up to date with imports. | ||
[[Datei:WDB Prüffrage erstellen.PNG|left|thumb| | [[Datei:WDB Prüffrage erstellen.PNG|left|thumb|900px|Form for creating a review question]]<br clear=all> | ||
=== <span id="meas"></span> | <span id="Maßnahmen"></span> | ||
=== <span id="meas"></span>Measures === | |||
---- | ---- | ||
This tab lists all measures in the KB. It also allows the creation of new measures. | |||
[[Datei:WDB Maßnahmen.PNG|left|thumb|900px| | [[Datei:WDB Maßnahmen.PNG|left|thumb|900px|KB tab Measures]]<br clear=all> | ||
==== ''' | <span id="Maßnahme_erstellen,_bearbeiten_und_löschen"></span> | ||
==== '''Create, edit, and delete measure''' ==== | |||
To create a measure, click the "Create new measure" button shown above. | |||
To edit or delete a measure, double-click the desired measure. Then the measure can be edited or deleted (via the "trash can" icon). | |||
[[Datei:WDB Maske Maßnahme erstellen.PNG|left|thumb|888px| | [[Datei:WDB Maske Maßnahme erstellen.PNG|left|thumb|888px|Form for creating a measure]]<br clear=all> | ||
''' | '''Properties:''' | ||
*<u> | *<u>Numbering and title:</u> The numbering should be logical and comprehensible. The title should be informative, so the user immediately knows what the measure is about. | ||
*<u> | *<u>Description:</u> Describe the measure here, i.e. explain what needs to be done to implement the measure. | ||
*<u>Norm | *<u>Norm mapping:</u> If the measure touches one or more norm chapters, this should be recorded here. This allows the creation of a compliance report for a norm. | ||
*<u> | *<u>Effective date:</u> The effective date should be the date of creation or that of the latest revision. | ||
*<u>ID | *<u>External ID:</u> With this ID a measure can be updated through an import. For this, the ID needs to match the ID of the measure in the import. This field should only be set manually if the measure originates in an external system but the measures were created manually before the import and are now to be kept up to date with imports. | ||
=== <span id="con"></span> | <span id="Kontrollen"></span> | ||
=== <span id="con"></span>Controls=== | |||
---- | ---- | ||
This tab lists all controls in the KB. It also allows the creation of new controls. | |||
= | [[Datei:WDB Kontrollen.png|left|thumb|900px|KB tab Controls]]<br clear=all> | ||
<span id="Kontrolle_erstellen,_bearbeiten_und_löschen"></span> | |||
==== '''Create, edit, and delete control''' ==== | |||
To create a control, click the "Create new control" button shown above. | |||
To edit or delete a control, double-click the desired control. Then the control can be edited or deleted (via the "trash can" icon). | |||
[[Datei:WDB Maske Kontrolle erstellen.PNG|left|thumb|903px|Form for creating a control]]<br clear=all> | |||
'''Properties:''' | |||
*<u> | *<u>Numbering and title:</u> The numbering should be logical and comprehensible. The title should be informative, so the user immediately knows what the control examines. | ||
*<u>Description:</u> Describe the control here, i.e. explain what needs to be done to implement the control. | |||
*<u> | |||
<!-- NO TRANSLATION | |||
-- | |||
NO TRANSLATION --> | |||
*<u> | *<u>Recurring control:</u> An interval can be set here to repeat the control every X years/months/etc. | ||
*<u> | *<u>Norm mapping:</u> If the control touches one or more norm chapters, this should be recorded here. This allows the creation of a compliance report for a norm. | ||
*<u>Effective date:</u> The effective date should be the date of creation or that of the latest revision. | |||
*<u>ID | *<u>External ID:</u> With this ID a control can be updated through an import. For this, the ID needs to match the ID of the control in the import. This field should only be set manually if the control originates in an external system but the controls were created manually before the import and are now to be kept up to date with imports. | ||
=== <span id="begv"></span> | <span id="Begründungsvorlagen"></span> | ||
=== <span id="begv"></span>Justification templates === | |||
---- | ---- | ||
This tab lists all justification templates in the KB. It also allows the creation of new justification templates. | |||
[[Datei:WDB Begründungsvorlagen.png|left|thumb|900px| | [[Datei:WDB Begründungsvorlagen.png|left|thumb|900px|KB tab Justification templates]]<br clear=all> | ||
==== ''' | <span id="Begründungsvorlage_erstellen,_bearbeiten_und_löschen"></span> | ||
==== '''Create, edit, and delete justification template''' ==== | |||
To create a justification template, click the "Create new justification template" button shown above. | |||
To edit or delete a justification template, double-click the desired justification template. Then the justification template can be edited or deleted (via the "trash can" icon). | |||
[[Datei:WDB Maske Begründungsvorlagen erstellen.PNG|left|thumb|903px| | [[Datei:WDB Maske Begründungsvorlagen erstellen.PNG|left|thumb|903px|Form for creating a justification template]]<br clear=all> | ||
''' | '''Properties:''' | ||
*<u> | *<u>Numbering and title:</u> The numbering should be logical and comprehensible. The title should be informative, so the user immediately knows what purpose the justification template serves. | ||
*<u> | *<u>Description:</u> You can enter a text here that can be used as template for a justification in a gap analysis. | ||
*<u> | *<u>Effective date:</u> The effective date should be the date of creation or that of the latest revision. | ||
*<u>ID | *<u>External ID:</u> With this ID a justification template can be updated through an import. For this, the ID needs to match the ID of the justification template in the import. This field should only be set manually if the justification template originates in an external system but the justification templates were created manually before the import and are now to be kept up to date with imports. | ||
=== <span id="threa"></span> | <span id="Bedrohungen"></span> | ||
=== <span id="threa"></span>Threats === | |||
---- | ---- | ||
This tab lists all threats in the KB. It also allows the creation of new threats. | |||
[[Datei:WDB Bedrohungen.png|left|thumb|900px| | [[Datei:WDB Bedrohungen.png|left|thumb|900px|KB tab Threats]]<br clear=all> | ||
==== ''' | <span id="Bedrohung_erstellen,_bearbeiten_und_löschen"></span> | ||
==== '''Create, edit, and delete threat''' ==== | |||
To create a threat, click the "Create new threat" button shown above. | |||
To edit or delete a threat, double-click the desired threat. Then the threat can be edited or deleted (via the "trash can" icon). | |||
[[Datei:WDB Maske Bedrohung erstellen.PNG|left|thumb|903px| | [[Datei:WDB Maske Bedrohung erstellen.PNG|left|thumb|903px|Form for creating a threat]]<br clear=all> | ||
''' | '''Properties:''' | ||
*<u> | *<u>Numbering and title:</u> The numbering should be logical and comprehensible. The title should be informative, so the user immediately knows what the threat is, e.g. missing or insufficient security when processing personal data. | ||
*<u> | *<u>Description:</u> Describe the threat here, i.e. explain what exactly it is that poses a threat. | ||
<!-- | <!-- NO TRANSLATION | ||
NO TRANSLATION | |||
NO TRANSLATION | |||
NO TRANSLATION --> | |||
--> | |||
*<u> | *<u>Assigned protection targets and weightings:</u><br> | ||
:: | :: Choose, which protection targets are affected if a threat were to occur.<br>Example: | ||
::: | :::Threat: break-in | ||
:::* | :::*A burglar could get into the server room and steal a hard-drive containing sensitive information. | ||
::: | :::If this happened, great damage concerning confidentiality, integrity, and availability could be done. | ||
:::{| class="wikitable" | :::{| class="wikitable" | ||
|- | |- | ||
! | ! Protection target !! weighting!! explanation | ||
|- | |- | ||
| | | Confidentiality | ||
|style="text-align:center;"| 4 | |style="text-align:center;"| 4 | ||
| | | break-in and theft of a hard-drive | ||
|- | |- | ||
| | | Availability | ||
|style="text-align:center;"| 4 | |style="text-align:center;"| 4 | ||
| | | the burglar could destroy something | ||
|- | |- | ||
| | | Integrity | ||
|style="text-align:center;"| 3 | |style="text-align:center;"| 3 | ||
| | | the burglar could make changes to a system | ||
|} | |} | ||
*<u>Norm | *<u>Norm mapping:</u> If the threat touches one or more norm chapters, this should be recorded here. This allows the creation of a compliance report for a norm. | ||
*<u> | *<u>Effective date:</u> The effective date should be the date of creation or that of the latest revision. | ||
*<u>ID | *<u>External ID:</u> With this ID a threat can be updated through an import. For this, the ID needs to match the ID of the threat in the import. This field should only be set manually if the threat originates in an external system but the threats were created manually before the import and are now to be kept up to date with imports. | ||
Aktuelle Version vom 10. April 2025, 09:07 Uhr
TogetherSecure creates and provides knowledge bases. Also, any user with the expert role in risk management is able to create a new knowledge base or modify an existing one. In other words, a a knowledge base can be created or changed by any expert.
This means, experts can add and hierarchically sort topics. Topics are then assigned review questions, either newly created or from an existing pool of questions. In the next step, threats, justification templates, measures, and/or controls can be created or assigned from existing ones. If, for example, a knowledge base already includes measures and controls (as is the case with BSI IT-Grundschutz), that means appropriate measures and controls have already been thought up for the offered threats. Users are encouraged, however, to evaluate their respective scenarios and create additional measures and/or controls for the treatment of the threats.
Create/edit knowledge base
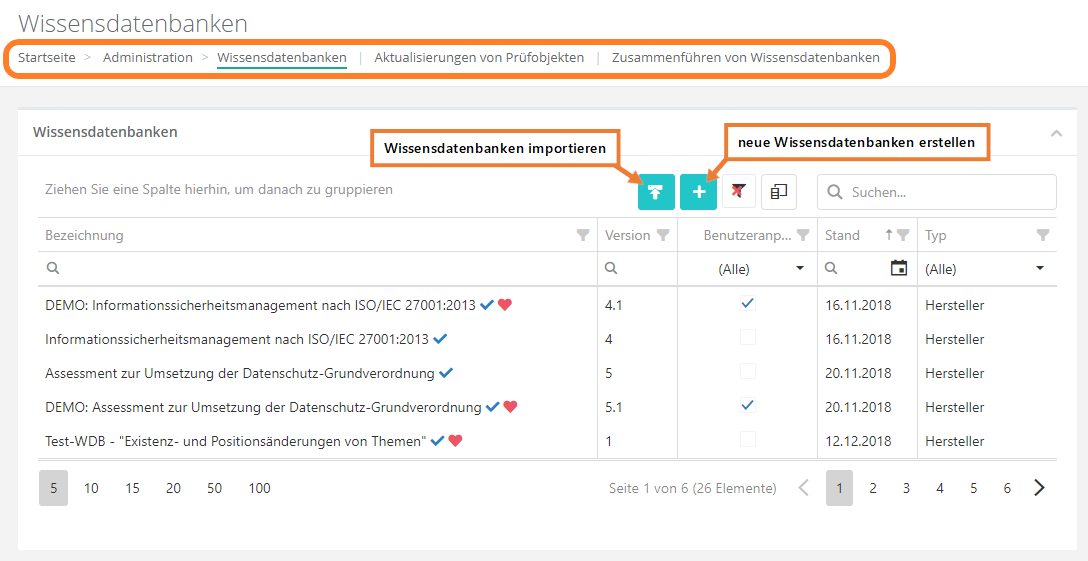
To create or edit a knowledge base, navigate to "Administration → Knowledge bases".
Here, all knowledge bases are listed, whether they have been published or not. Only published knowledge bases can be used for reviews. Published knowledge bases are marked with a green tick. If there are multiple versions of a knowledge base, one can be declared the default version (see: edit). It is then marked with a red heart.
Create:
- To create a new knowledge base, click the "Create new knowledge base" button. Then, enter the header information, create topics and their review questions, and finally assign measures, controls, justification templates, and threats.
Edit:
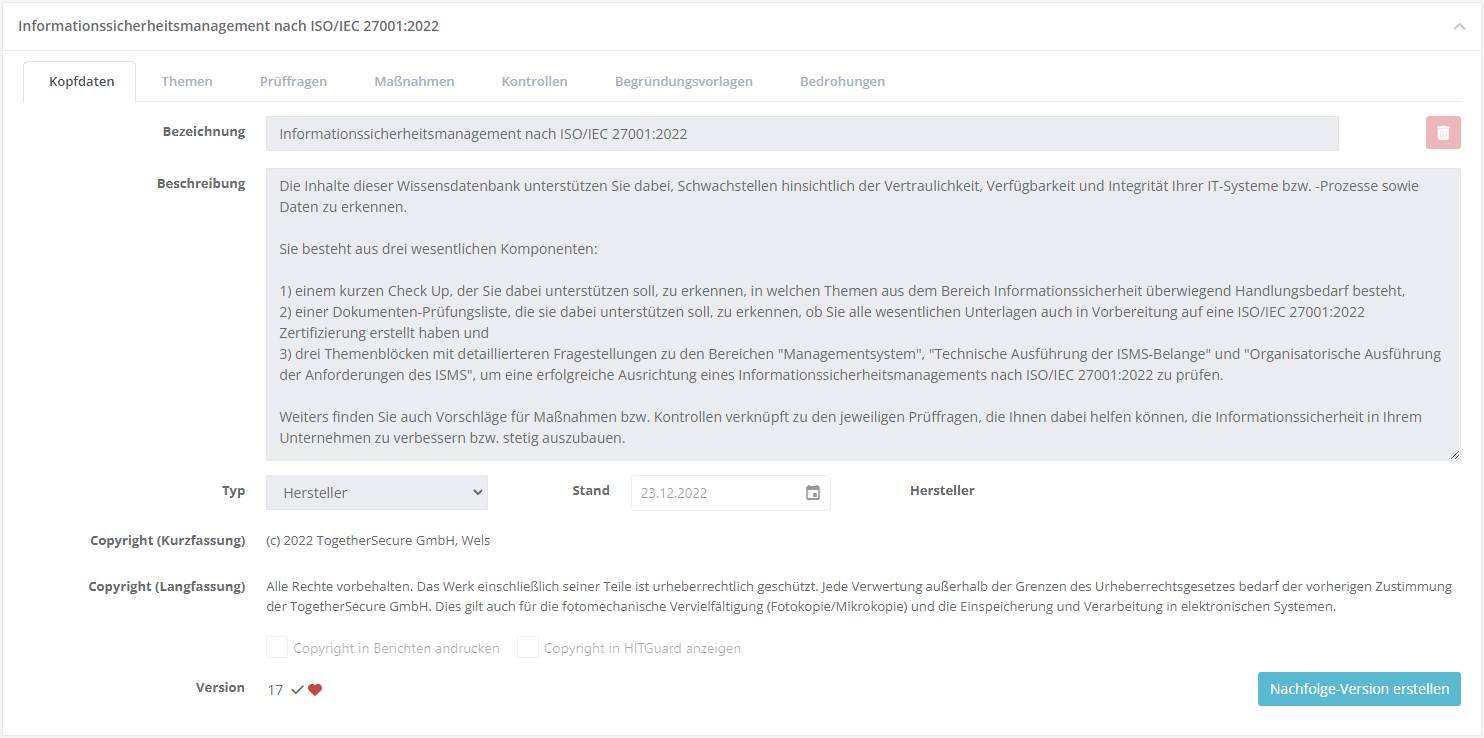
- To edit a KB, click on the desired KB. Published knowledge bases are read-only and can therefore no longer be modified. If a KB has been published, you need to create a superseding version or a user adaptation (of a vendor knowledge base). In the same interface, you can also set a KB as the default version if multiple versions of the KB exist.
- The superseding version is unpublished and can therefore be edited.
Header information
In the header data, briefly describe the purpose of the knowledge base. Depending on whether it is a self developed knowledge base or one for a norm, you need to set the type accordingly, set the effective date, and add the creator (e.g. name or company). Caution: only KBs of the types vendor or norm or standard can be exported.
Type vendor and norm or standard
To create KBs of the type vendor or norm or standard, you need to have a vendor license! These KBs are also the only ones that can be exported.
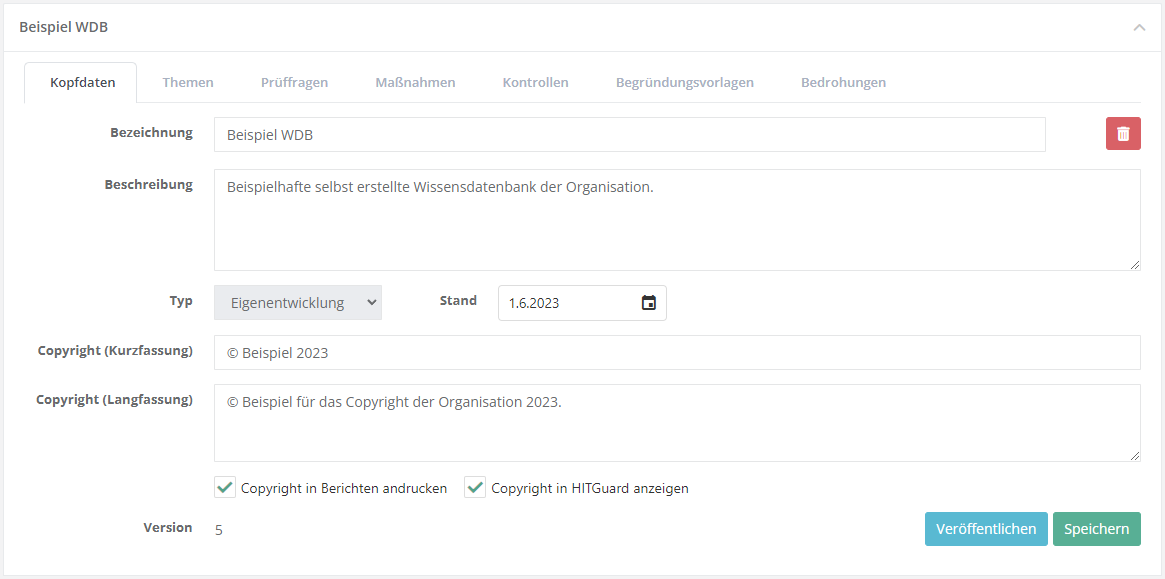
In self-developed knowledge bases, you can use the checkboxes to configure whether the short version of the copyright is to be displayed/printed in the review assistant and with the review question in a report.
Topics
Here, all the topics that are part of the KB are listed hierarchically. The purpose of topics is to give knowledge bases a meaningful structure.
Create/edit topic
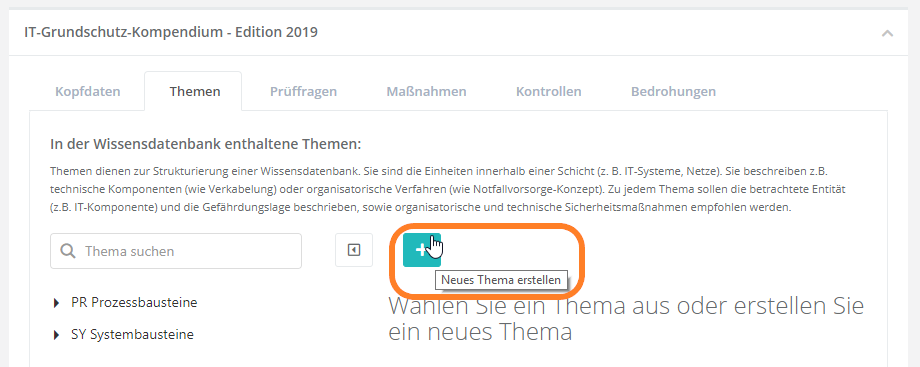
To create a new topic, navigate to the tab "Topics" and click on "create new topic". Then fill out the displayed form.
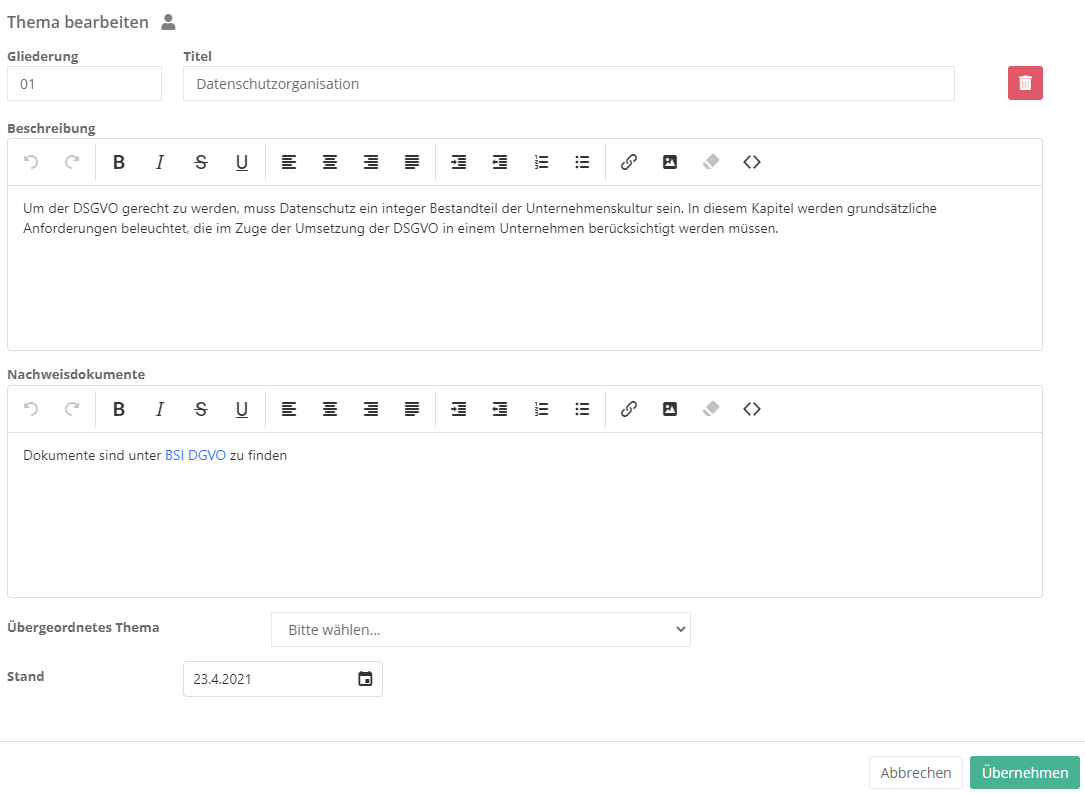
- Numbering and title: Here, set the numbering and the title. The numbering should help clarify the KB's structure, e.g. 1, 1.1, 1.2, etc. The title should be informative, so the user immediately knows what questions the topic covers. Note: The topics are automatically sorted alphabetically or in ascending numerical order, respectively. With a larger number of numbered topics, it is advisable to use a leading zero in order to have the sorting order match expectations (e.g., 01, 02, 03 ... 10, 11, etc.).
- Description: Here, describe the purpose of the topic. This text field supports HTML formatting.
- Supporting documents: Here, record references or links to documents that might be relevant for the preparation of auditing this topic. If the topic is used in a review by knowledge base, the supporting documents are shown in the review assistant. The supporting documents are also printed with the respective review object in audit and review reports.
- Parent topic: If the topic is a subordinate one, the parent topic has to be set here so the KB is structured properly.
- Effective date: This should be the date of the latest revision.
Assign review questions
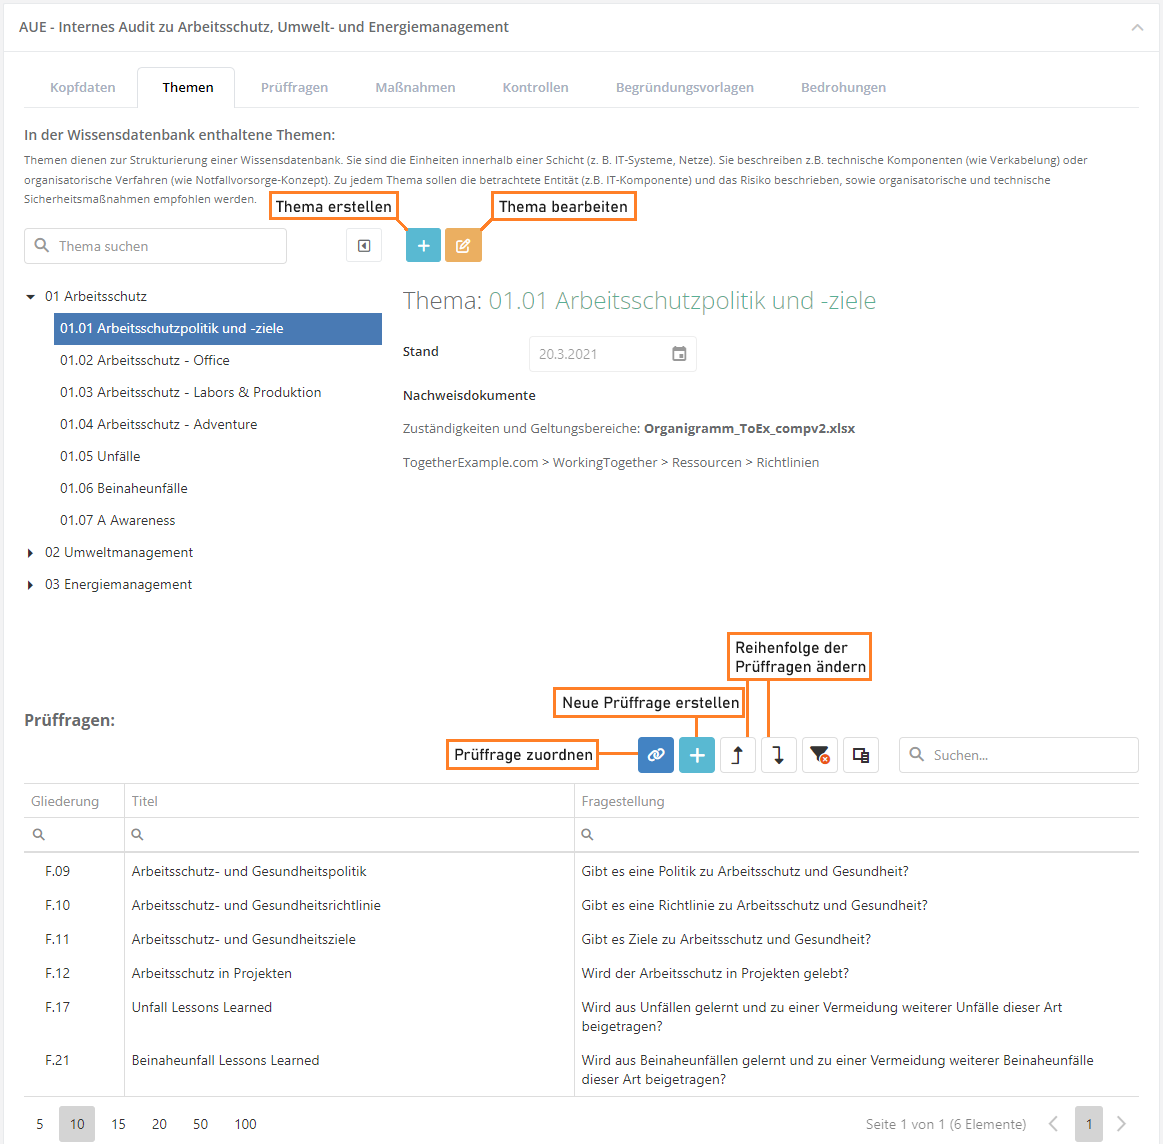
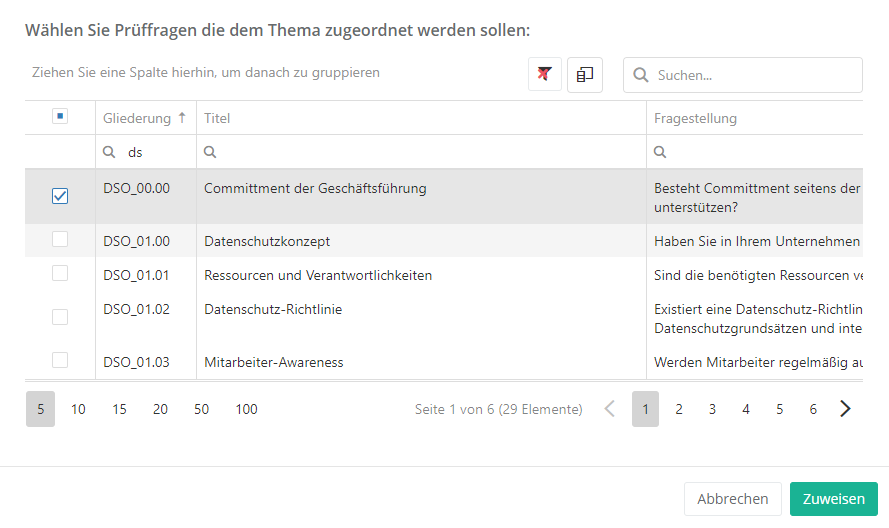
Once you have created a topic, you need to assign it questions. For this, you may use existing review questions or create new questions. When the question is assigned, you should in turn also assign measures, controls, and threats to the question.
Normally, the review questions are sorted according to the sort order (hidden column). This is also the order in which they are listed in gap analyses. The arrows next to the plus button can be used to adjust the sort order of the review questions.
Configure sub-questions
To sort review questions hierarchically, double-click the questions you want to be subordinates and choose a parent question for them (only one layer is supported, meaning a sub-question cannot have further sub-questions). Then, you can choose how the sub-question is to behave depending on the parent question's answer.
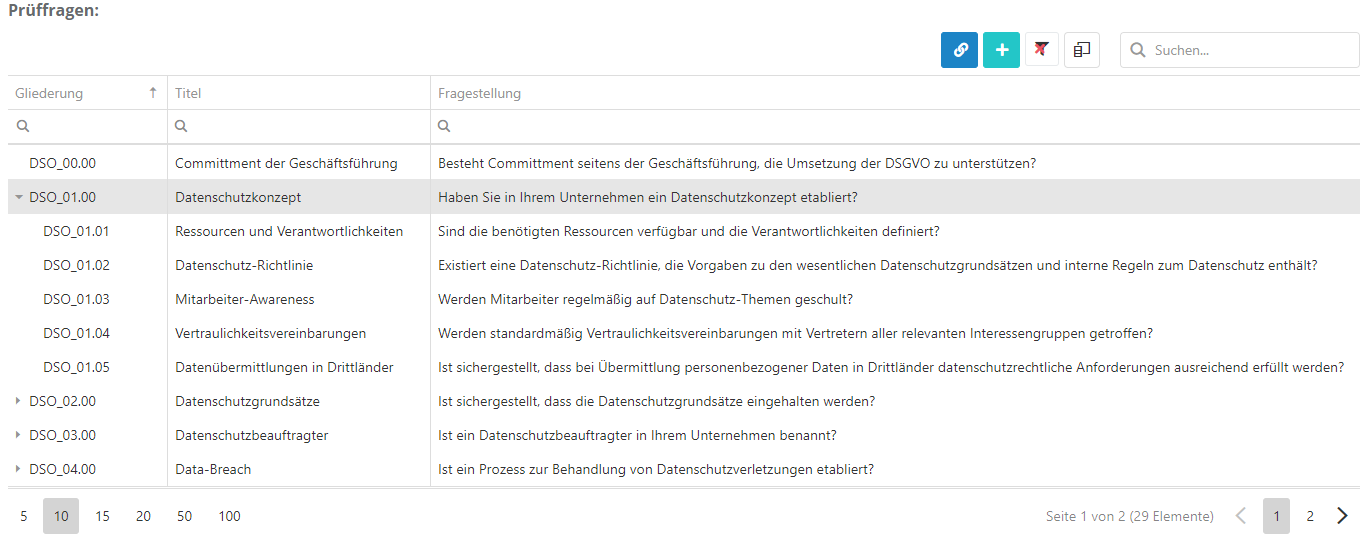
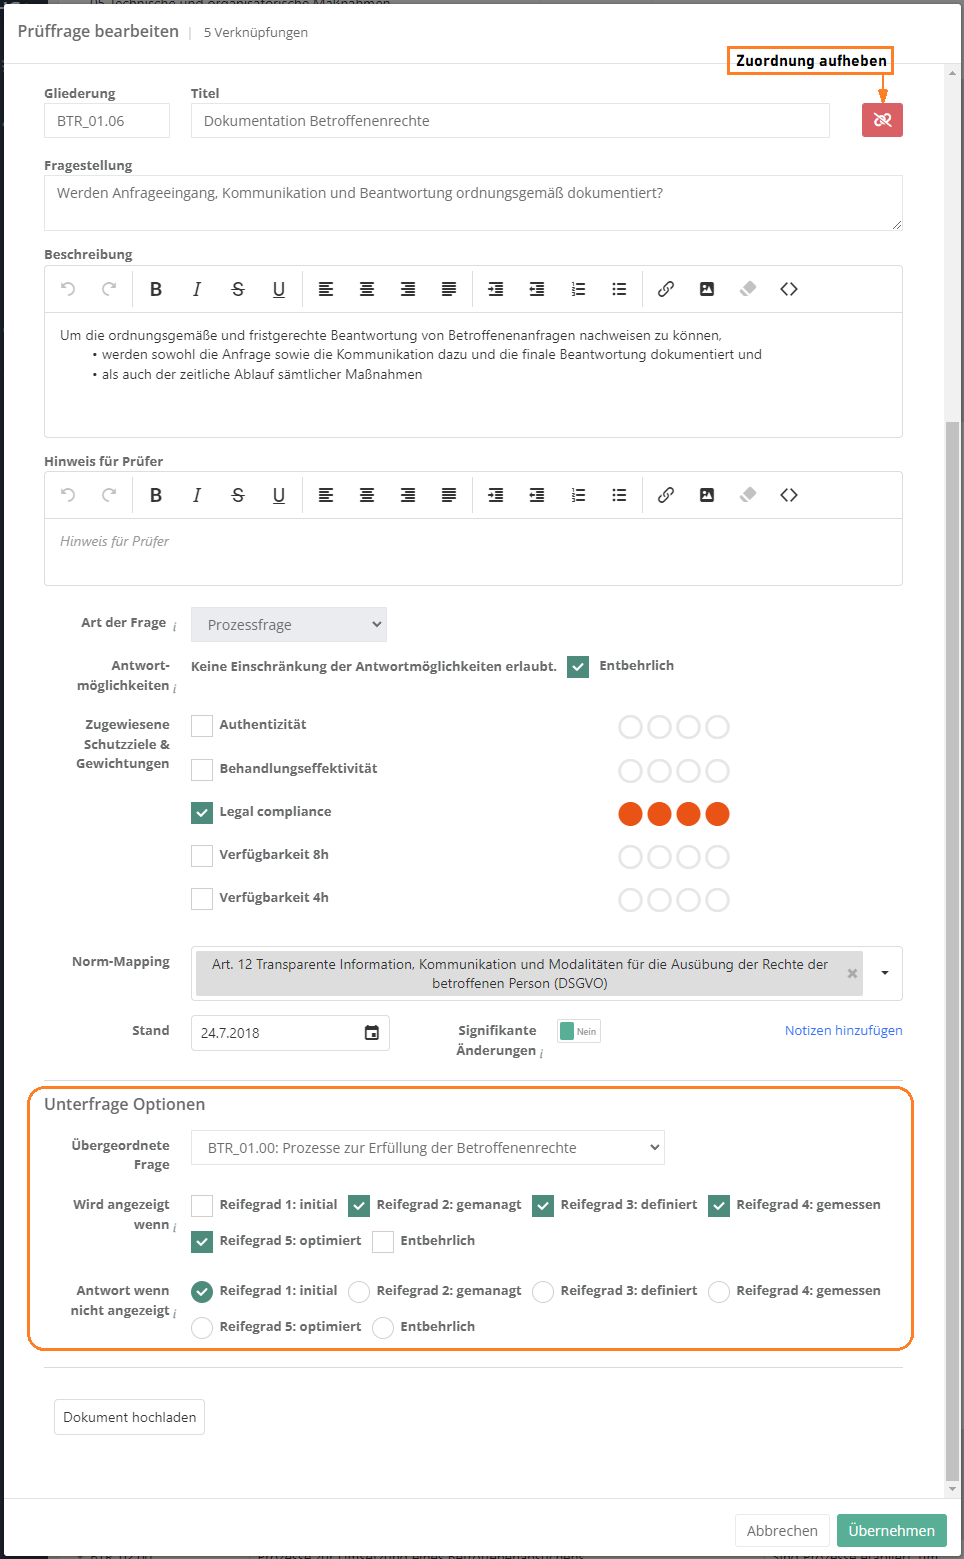
In reports, structural questions are formatted in italics and their corresponding sub-questions are indented below them.
Assign and edit measures, controls, justification templates, and threats
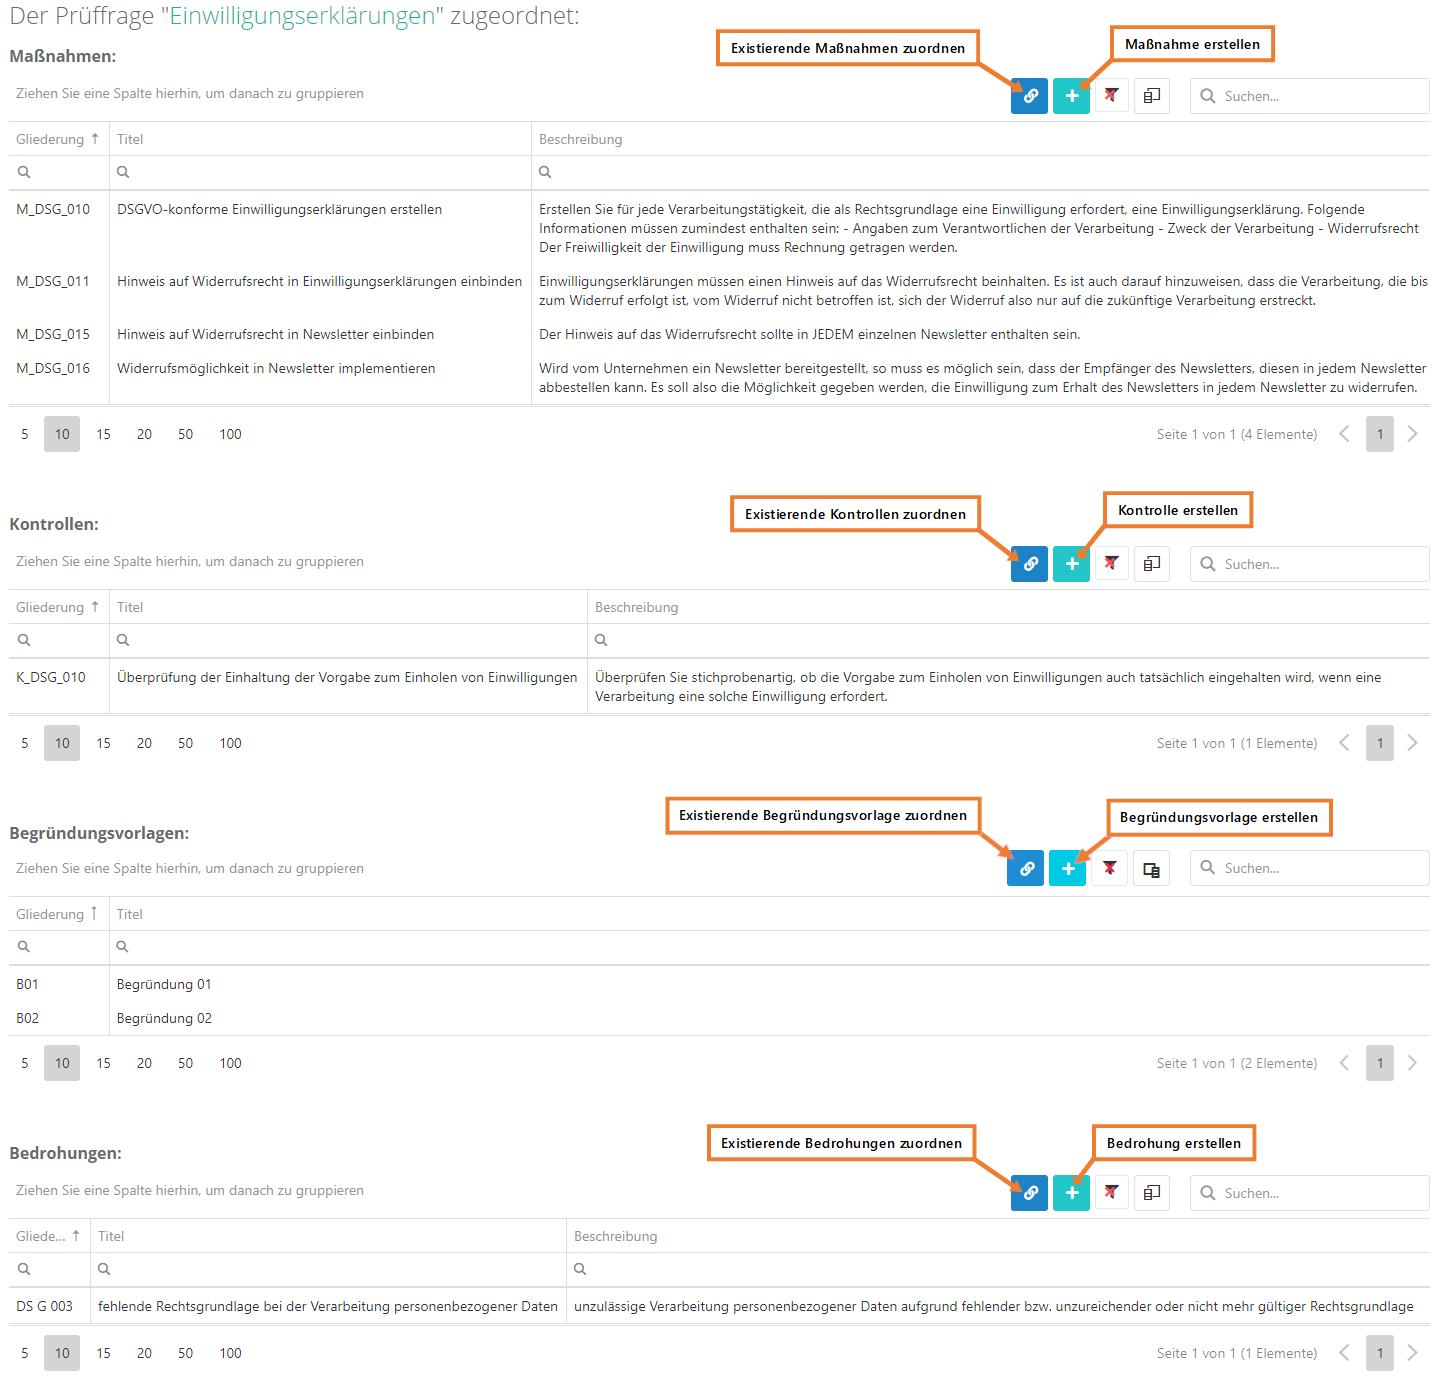
Measures and controls that have been assigned to a review questions are suggested during risk treatment, if their question shows a gap during an assessment. Justification templates can be used as a justification for an answer. If threats are assigned, the question is listed with the threats for analysis purposes.
assign or create:
- The forms for assigning existing measures, controls, justification templates, and threats are the same as the one for assigning review questions, with the exception of the actual content.
- To create see create measure, create control, create justification template, and create threat.
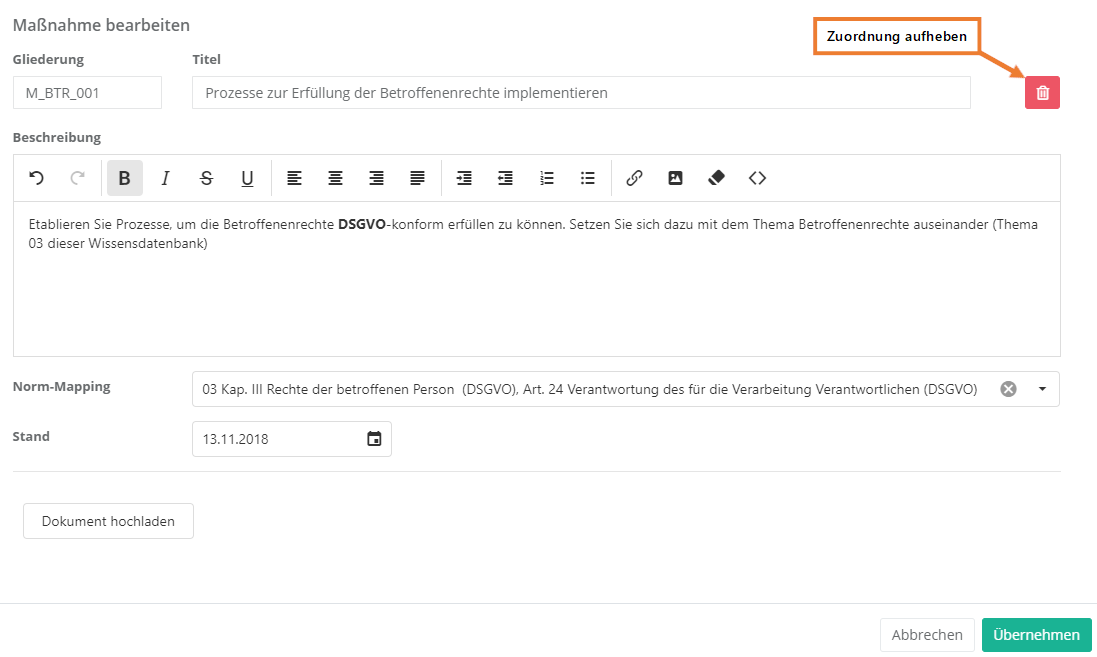
edit and remove assignment:
- As shown above, double-click an element to open its editing interface and edit its properties. Here, you can also remove the assignment to the review question.
Review questions
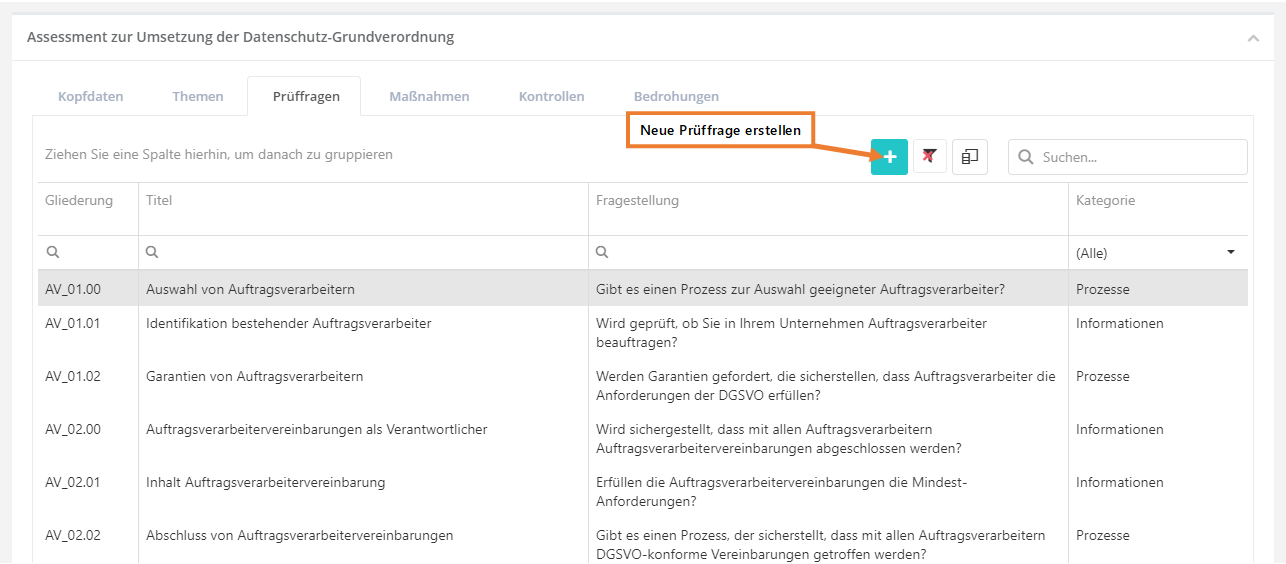
This tab shows a list of all review questions that exist in the KB. However, they do not show a hierarchy here, this is only displayed under the topics. This tab also lets you create new review questions.
Create, edit, and delete a review question
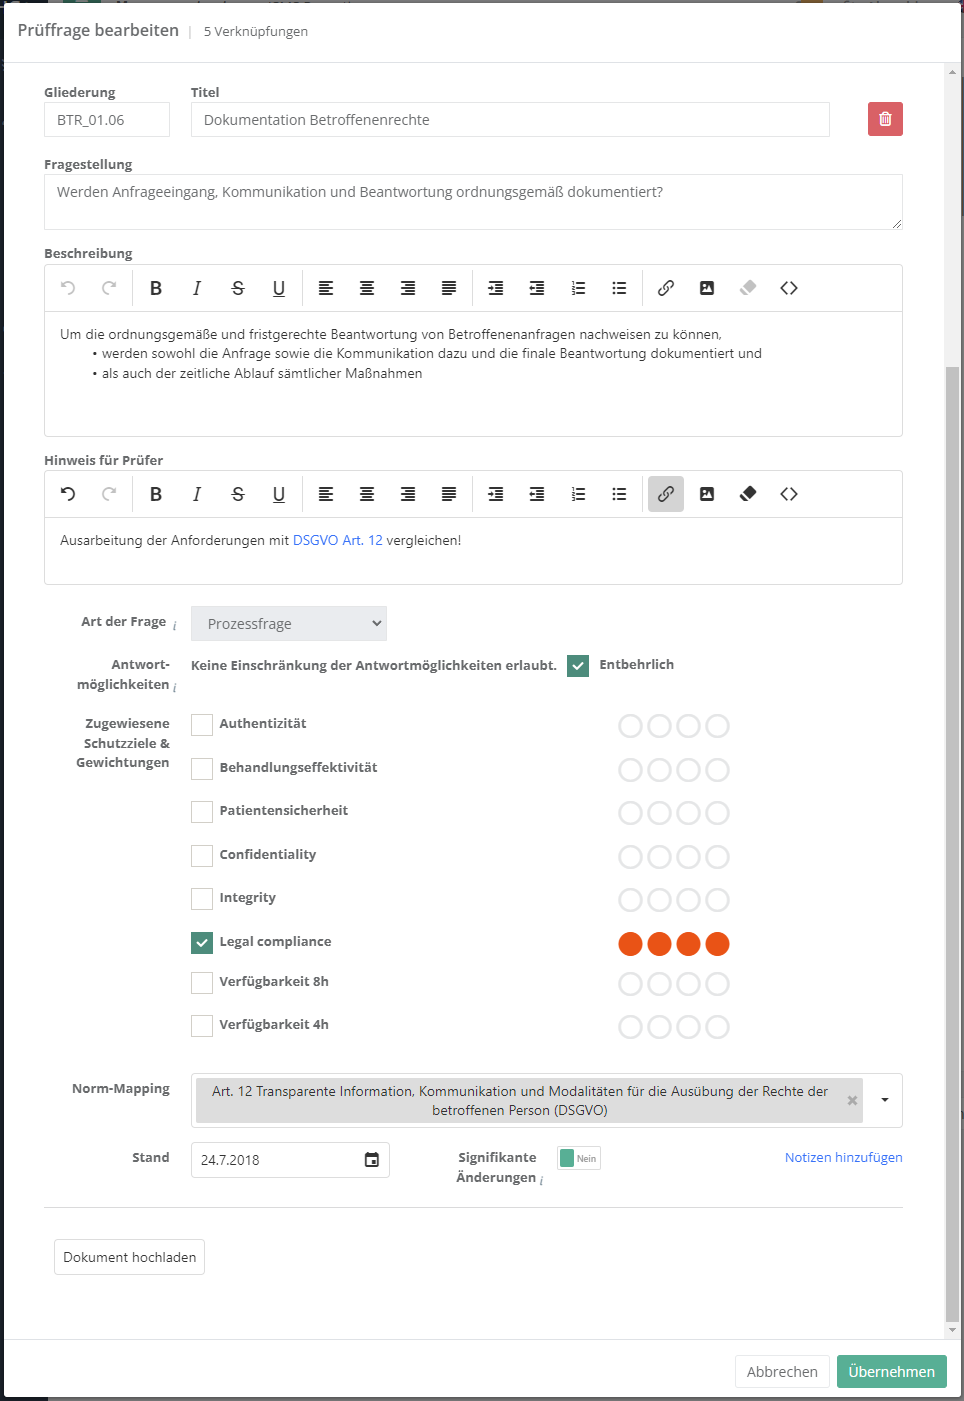
To create a review question, click the "Create new question" button shown above. To edit or delete a question, double-click the desired question. Then the question can be edited or deleted (via the "trash can" icon). The behaviour of sub-questions can only be changed in the topics tab.
Properties:
- Numbering and title: The numbering should be logical and comprehensible, e.g. an abbreviation of the topic and a serial number (DSO_01.00). The title should be informative, so the user immediately knows what the question is about.
- Question: Pose a clearly formulated question here.
- Description: If necessary, further describe the question here. For example, you might describe the basic conditions that need to be fulfilled for a question to be answered positively.
- Hint for auditors: Information for auditors can be recorded here. This could, for instance, be links to documents the answers should be compared to, or a checklist with the exam steps. This information is only shown in gap analyses that have been opened either in "Risk management → Vulnerabilities" or from an audit. (It is not displayed if the analysis has been opened in the context of "My tasks".)
- Type of question: Choose whether it is a technical or a process question, or an information gathering. Technical questions are answered with Yes, No, or Partly and process questions with a maturity level from 0 to 5.
- Note: Information gatherings in reviews are seen as answered if the comment was filled in and/or at least one file was uploaded as evidence.
- Answer types and unnecessary: This option allows you to limit the answer types for the question. This is only possible for technical questions. The option "unnecessary" dictates whether a question has to be answered or not. Note that setting a structural question as unnecessary will affect its sub-questions, as their behaviour in response to an unnecessary structural question can be configured. Information gatherings are not subject to evaluation, but can be marked as Unnecessary.
- Assigned protection targets and weightings (not for information gatherings):
- Choose, which protection targets are affected if a question reveals a gap.
Example:- Review question about server room security
- Has the door been furnished with a security lock?
- If this question is answered No, major risks concerning confidentiality, integrity, and availability can develop.
- Review question about server room security
- Choose, which protection targets are affected if a question reveals a gap.
Protection target weighting explanation Confidentiality 4 break-in and theft of a hard-drive Availability 4 the burglar could destroy something Integrity 3 the burglar could make changes to a system
- Norm mapping: If the question touches one or more norm chapters, this should be recorded here. This allows the creation of a compliance report for a norm.
- Effective date: The effective date should be the date of creation or that of the latest revision.
- Author's notes: Clicking "Add note" allows the author to record a note for themselves. They could, for example, add to-dos or links to external sources. This information is only visible for the editor of a KB. It has no effect on assessments and is of a purely editorial nature. It is also not exported or imported with a KB.
- External ID: With this ID a review question can be updated through an import. For this, the ID needs to match the ID of the review question in the import. This field should only be set manually if the review question originates in an external system but the questions were created manually before the import and are now to be kept up to date with imports.
Measures
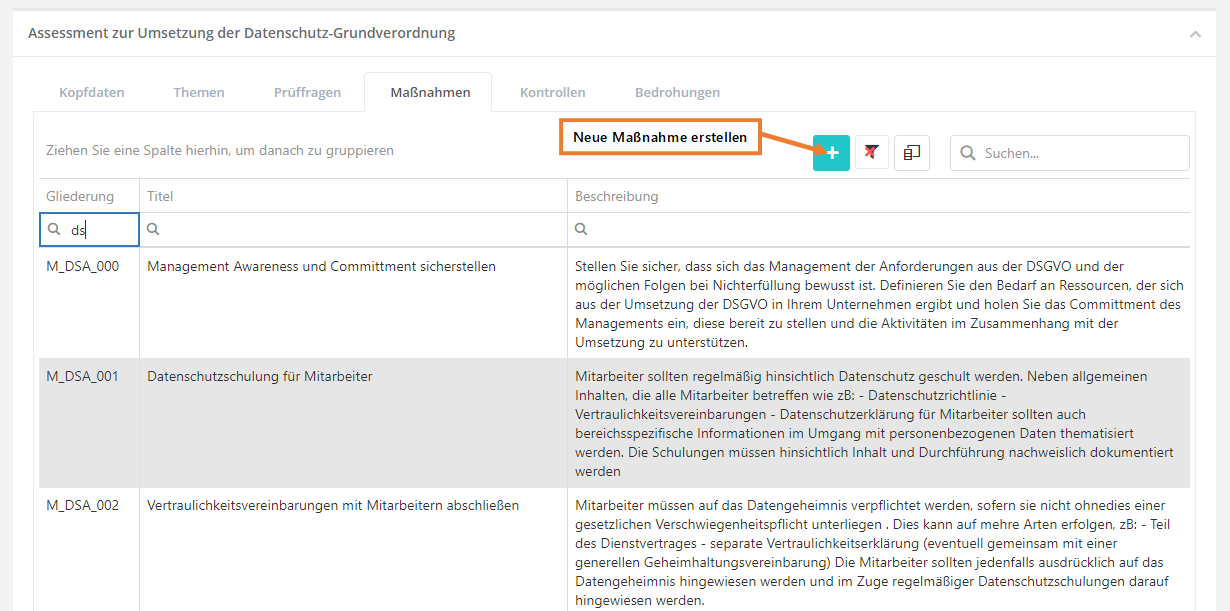
This tab lists all measures in the KB. It also allows the creation of new measures.
Create, edit, and delete measure
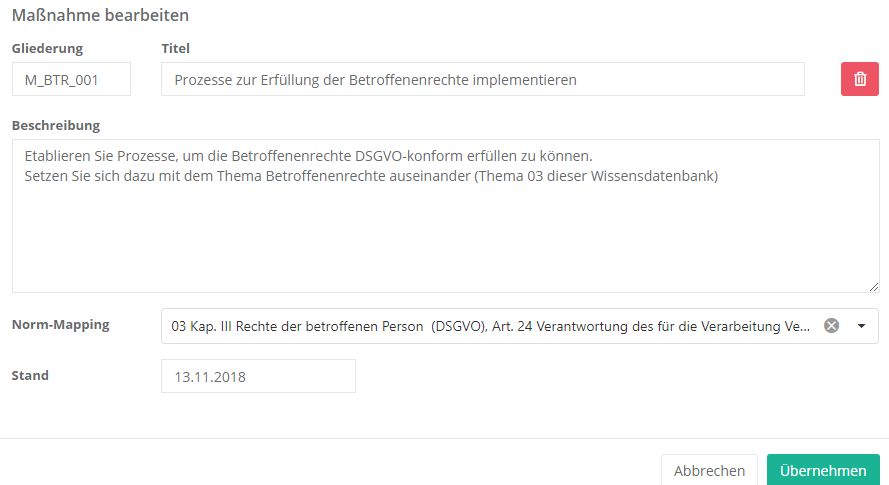
To create a measure, click the "Create new measure" button shown above. To edit or delete a measure, double-click the desired measure. Then the measure can be edited or deleted (via the "trash can" icon).
Properties:
- Numbering and title: The numbering should be logical and comprehensible. The title should be informative, so the user immediately knows what the measure is about.
- Description: Describe the measure here, i.e. explain what needs to be done to implement the measure.
- Norm mapping: If the measure touches one or more norm chapters, this should be recorded here. This allows the creation of a compliance report for a norm.
- Effective date: The effective date should be the date of creation or that of the latest revision.
- External ID: With this ID a measure can be updated through an import. For this, the ID needs to match the ID of the measure in the import. This field should only be set manually if the measure originates in an external system but the measures were created manually before the import and are now to be kept up to date with imports.
Controls
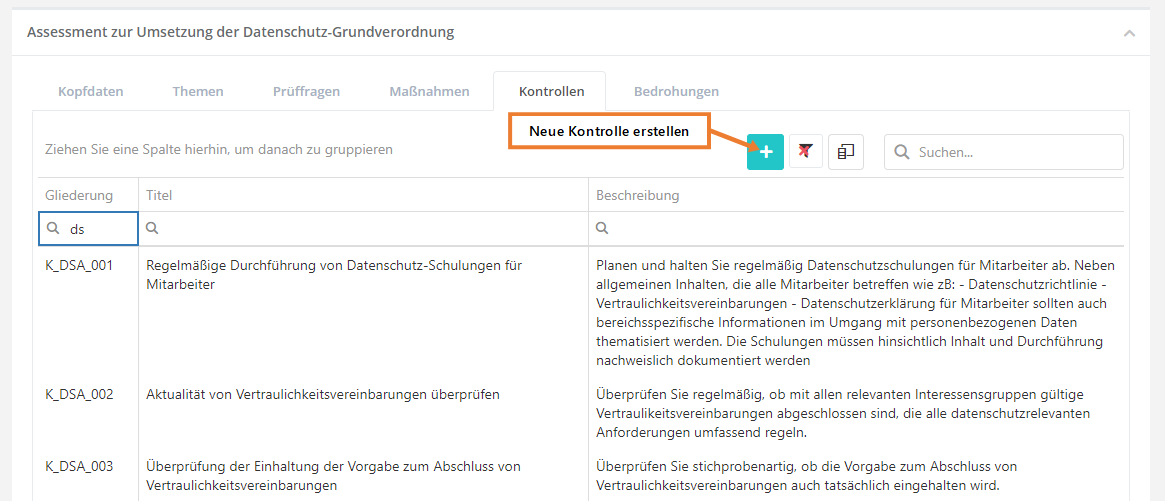
This tab lists all controls in the KB. It also allows the creation of new controls.
Create, edit, and delete control
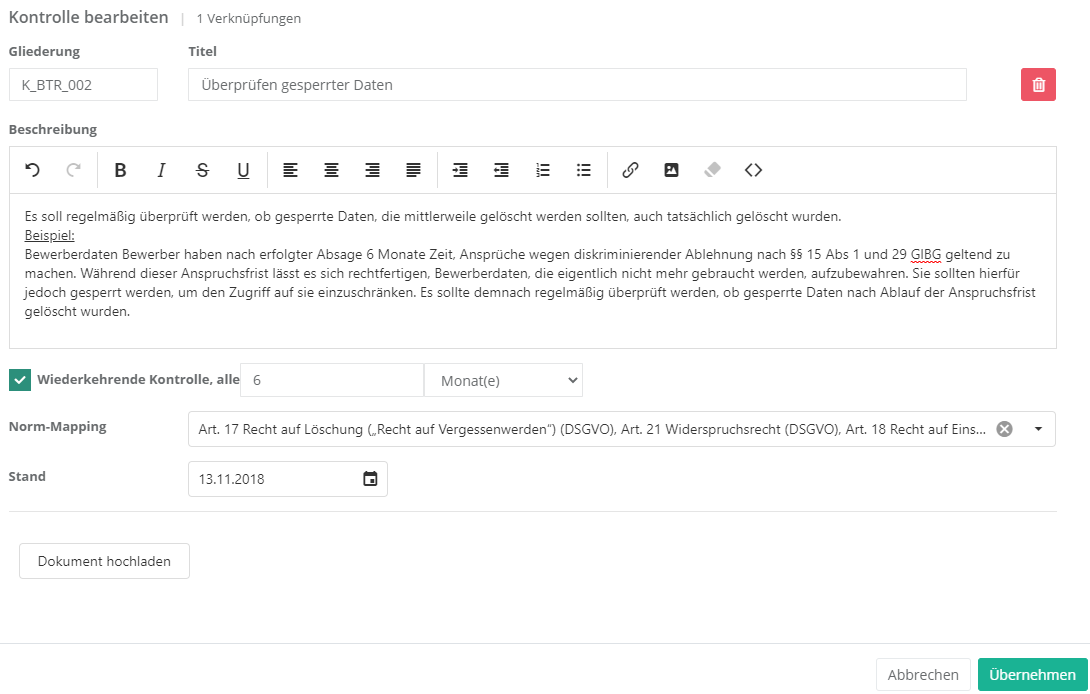
To create a control, click the "Create new control" button shown above. To edit or delete a control, double-click the desired control. Then the control can be edited or deleted (via the "trash can" icon).
Properties:
- Numbering and title: The numbering should be logical and comprehensible. The title should be informative, so the user immediately knows what the control examines.
- Description: Describe the control here, i.e. explain what needs to be done to implement the control.
- Recurring control: An interval can be set here to repeat the control every X years/months/etc.
- Norm mapping: If the control touches one or more norm chapters, this should be recorded here. This allows the creation of a compliance report for a norm.
- Effective date: The effective date should be the date of creation or that of the latest revision.
- External ID: With this ID a control can be updated through an import. For this, the ID needs to match the ID of the control in the import. This field should only be set manually if the control originates in an external system but the controls were created manually before the import and are now to be kept up to date with imports.
Justification templates
This tab lists all justification templates in the KB. It also allows the creation of new justification templates.

Create, edit, and delete justification template
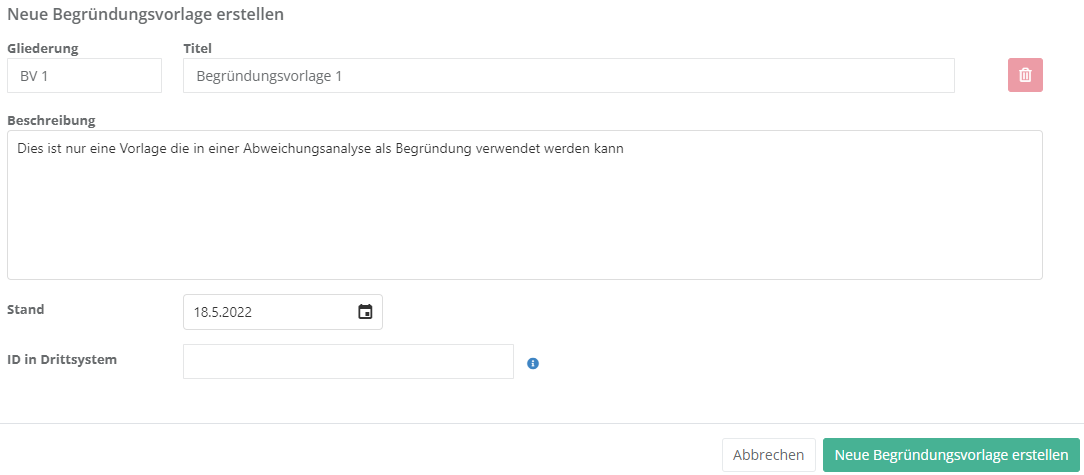
To create a justification template, click the "Create new justification template" button shown above. To edit or delete a justification template, double-click the desired justification template. Then the justification template can be edited or deleted (via the "trash can" icon).
Properties:
- Numbering and title: The numbering should be logical and comprehensible. The title should be informative, so the user immediately knows what purpose the justification template serves.
- Description: You can enter a text here that can be used as template for a justification in a gap analysis.
- Effective date: The effective date should be the date of creation or that of the latest revision.
- External ID: With this ID a justification template can be updated through an import. For this, the ID needs to match the ID of the justification template in the import. This field should only be set manually if the justification template originates in an external system but the justification templates were created manually before the import and are now to be kept up to date with imports.
Threats
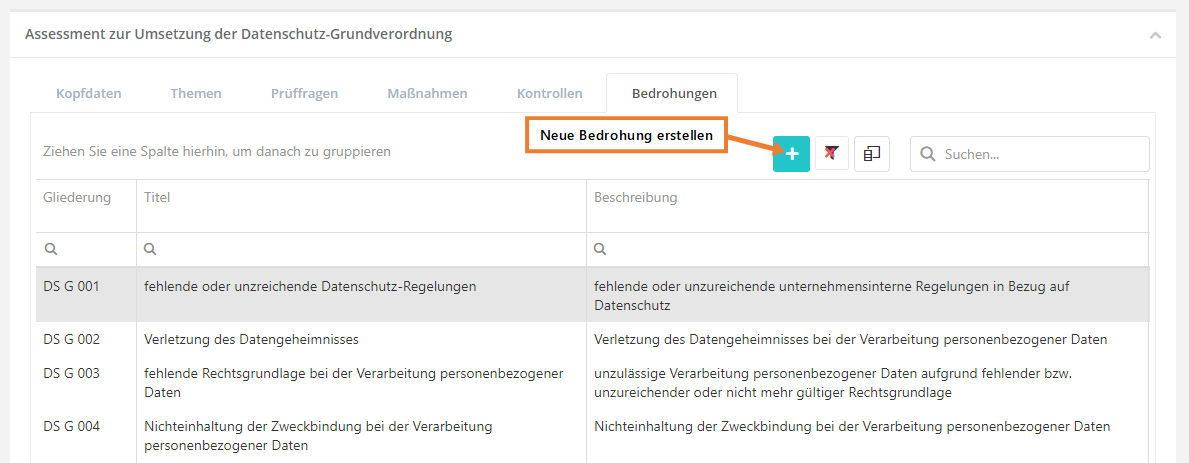
This tab lists all threats in the KB. It also allows the creation of new threats.
Create, edit, and delete threat
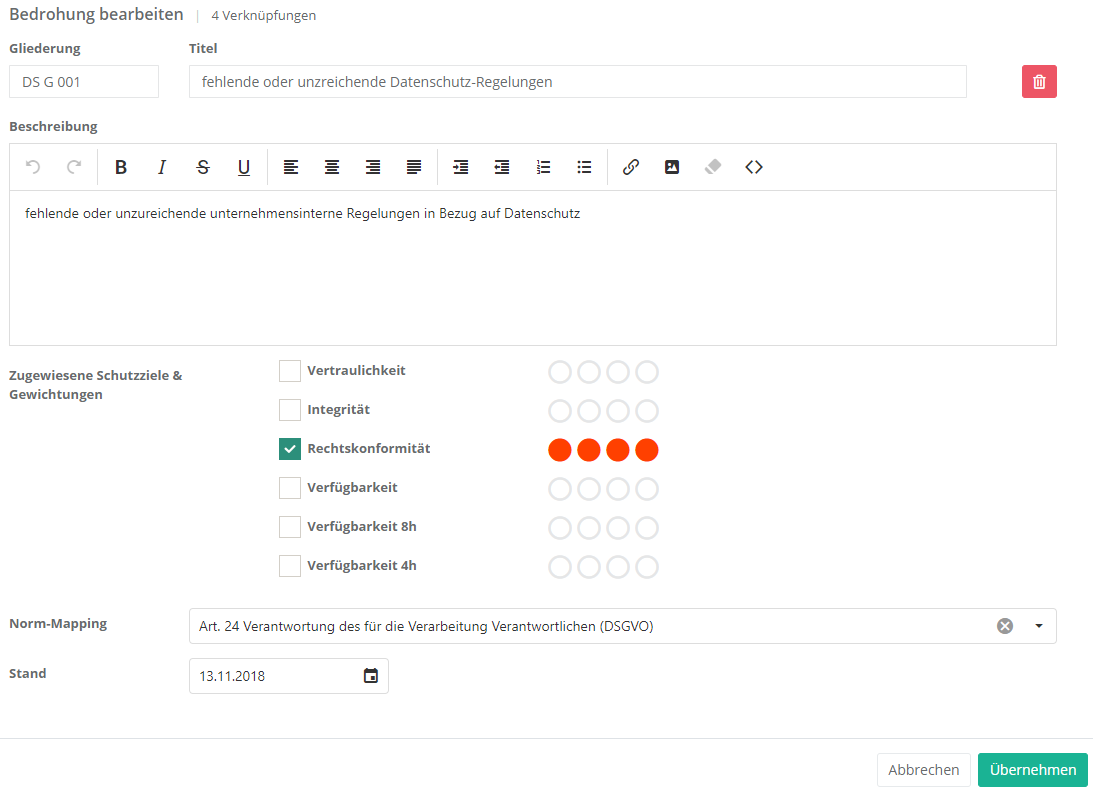
To create a threat, click the "Create new threat" button shown above. To edit or delete a threat, double-click the desired threat. Then the threat can be edited or deleted (via the "trash can" icon).
Properties:
- Numbering and title: The numbering should be logical and comprehensible. The title should be informative, so the user immediately knows what the threat is, e.g. missing or insufficient security when processing personal data.
- Description: Describe the threat here, i.e. explain what exactly it is that poses a threat.
- Assigned protection targets and weightings:
- Choose, which protection targets are affected if a threat were to occur.
Example:- Threat: break-in
- A burglar could get into the server room and steal a hard-drive containing sensitive information.
- If this happened, great damage concerning confidentiality, integrity, and availability could be done.
- Threat: break-in
- Choose, which protection targets are affected if a threat were to occur.
Protection target weighting explanation Confidentiality 4 break-in and theft of a hard-drive Availability 4 the burglar could destroy something Integrity 3 the burglar could make changes to a system
- Norm mapping: If the threat touches one or more norm chapters, this should be recorded here. This allows the creation of a compliance report for a norm.
- Effective date: The effective date should be the date of creation or that of the latest revision.
- External ID: With this ID a threat can be updated through an import. For this, the ID needs to match the ID of the threat in the import. This field should only be set manually if the threat originates in an external system but the threats were created manually before the import and are now to be kept up to date with imports.